Order management
Managing orders efficiently is a core function of the Revolut POS iOS app. The Order management feature allows you to handle orders seamlessly, from creation to payment. Whether it's adding items, splitting bills, or applying discounts, this feature is designed to simplify day-to-day operations and ensure smooth transactions for customers.
With tools for editing, transferring, and finalising orders, staff can focus on providing excellent service while keeping workflows organised. This page covers all the essential steps and advanced features to help you make the most of order management.
Register
The Register in the Revolut POS app is designed to simplify order management and streamline operations. It offers intuitive tools for creating orders, managing items, and processing payments.
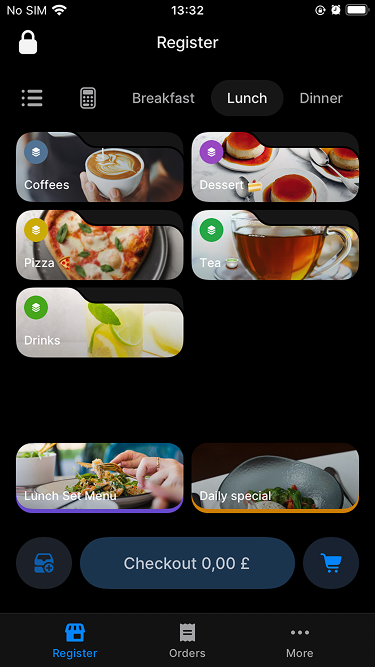
This screen consists of three main sections:
- Product Catalogue: Browse, search, and add products or custom items to the order.
- Cart Management: Access the cart to edit items, apply discounts, add service charges, and include notes.
- Checkout & Parking Options: Finalise the order with a checkout action or park the order for later processing.
Create new orders
Navigate to the Checkout menu from navigation bar.
Add products for orders:
- Browse or search for products in the catalogue.
- Alternatively, add a custom product by using the keypad.
You can customise your default screen in the app settings to suit your workflow and choose your Grid. Consult [Operational Settings: Store] to know more.
Tap on a product to add it to the order:
- If the product is a simple product (no modifiers/variations), it will be added directly to the order.
- If the product has modifiers/variations, you can choose them:

If the product has a unit price (e.g., for 1 litre of wine) a calculator opens to adjust the quantity and calculate the item's price.
Here you have the option to sell the product by unit - the system will calculate the price based on the quantity you enter, or by price - the system will calculate the unit for the price entered.
Customise orders
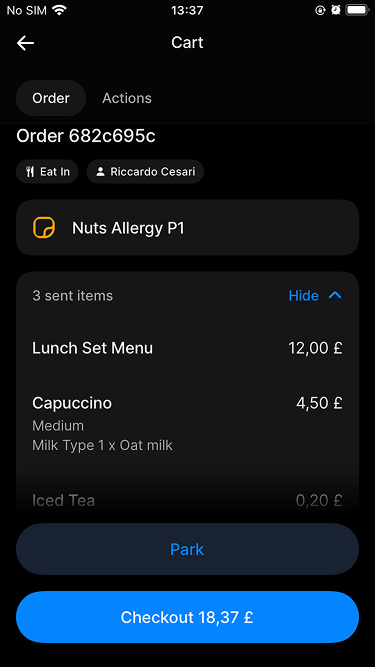
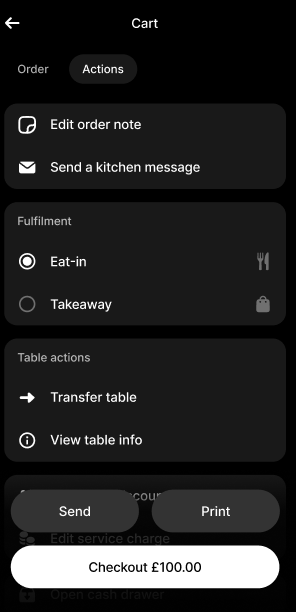
The Order summary in the checkout is divided into two tabs, each designed to help you manage different aspects of the order efficiently. To access it, simply tap the button on Register screen.
The Order tab displays the products in the order and allows you to make adjustments at the product level, such as editing or customising items. It also includes options for sending, printing the receipt and directly checkout.
The Actions tab focuses on order-level actions, such as adding notes, setting discounts, managing service charges, and assigning fulfillment details like table or takeaway.
Add notes
Efficient communication with the kitchen is essential for smooth operations and ensuring customer satisfaction. Below are three key features designed to streamline the process of sending instructions, notes, or updates to the kitchen. Follow the steps outlined to make the most of these tools.
Add notes to orders
Notes help communicate specific instructions to the kitchen, whether for individual products or the entire order. These notes ensure clear communication with the kitchen, streamlining order preparation and improving service accuracy. The Revolut POS app allows you to add both Product Notes and Order Notes easily.
For a Product note:
- Select the product in the Order tab before sending the order to the kitchen.
- Select
Add product note, write your note (e.g., "Extra cheese on this pizza"). - Tap
Saveto finalise your note.
For an Order note:
- Go to the Action tab before sending the order to the kitchen.
- Select
Add order note, write your note (e.g., "All dishes should be vegetarian"). - Tap
Saveto finalise your note.
Send message to kitchen
Standalone messages can be sent directly to the kitchen without attaching them to an order. This feature is perfect for communicating general information, such as operational updates (e.g., "Prepare additional bread baskets"). To send a message:
- Go to the Action tab.
- Select
Send a kitchen message. - Enter your message, tab
Saveto finalise it. - Tap
Sendto send your message to the kitchen.
Choose fulfilment type
The default order fulfilment type is set in your store's operational settings. For more details, see Operational settings: Store.
To change the fulfilment type for a specific order, go to the Actions tab and select your preferred option under Fulfilment.
You can also mark individual items as Takeaway. This will appear on printed tickets and, if you have set different prices or VAT rates for Takeaway, those will be applied. However, this does not affect the service charge. To mark an item as Takeaway:
- Press and hold the product.
- Click on
Mark as takeaway.
Add service charge
This feature allows you to customise service charges for each order as needed.
Service charges can be pre-determined in the Settings for all Eat-In orders. Consult [Operational settings: Checkout] to learn how to configure default service charges.
To add or edit the service charge for a specific order, follow these steps:
- Open the Action tab of the order.
- You can either edit or add service charge by selecting the corresponding action.
- Choose the pricing type:
- Percentage discount: Enter a percentage to deduct from the total.
- Fixed discount: Enter a fixed amount to deduct from the total.
- Tap
Saveto apply your changes.
Set discounts
You can apply discounts either to the entire order or to specific items within the order. However, the order must be sent before applying any discounts.
- Navigate to the Order tab, press and hold on the product you want to discount.
- Tap
Add product discountand choose the discount type:- Percentage discount: Enter a percentage to deduct from the total.
- Fixed discount: Enter a fixed amount to deduct from the total.
- Enter discount percentage/amount.
- Tap
Saveto add discount to the product.
The applied discount will appear in the order summary, whether it's for a specific item or the entire order.
Discount permissions may be restricted based on staff roles. Ensure you have the necessary permissions to apply discounts.
Other options
- Open cash drawer: Manually open the cash drawer without processing a payment (e.g., for cash handling or to make change).
- Discard bill: Permanently delete an order. This action removes the bill and its details.
Park orders
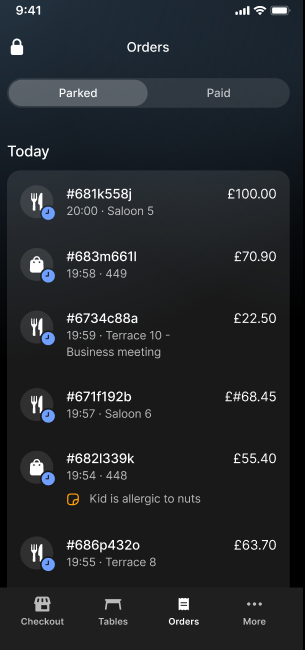
If you don't check out an order immediately, press the Park button to store the order. It will temporarily disappear from the Register view.
You can easily access your parked order on the Orders > Parked tab. The Parked tab allows you to find and manage bills that have been Set aside, Assigned to a table, or Partially paid.
Edit an order
From the Parked section, two actions are possible:
- Restore the order: Resume and edit the order.
- Print the order: Generate a physical copy for record-keeping or sharing with the customer.
Once an order is restored, you can:
- Edit the order:
- Add new items from the product catalog.
- Remove existing items by long press and selecting
Delete product.
- Discard the order:
- Permanently delete the bill by clicking on the in the top-right corner.
Refund an order
Paid orders are also visible in the Orders section, allowing you to review settled bills and track payment history and refund already paid bills. To issue a refund:
- Go to the Orders menu in the navigation bar.
- Select the Paid tab.
- Select the order you want to refund and tap
Refund. - Confirm the refund to complete the process.
Only full refunds are allowed, and the amount will be returned to the original payment method. Only managers can process refunds.
Take payments
When your customers are ready to pay, you need to finalise the order by pressing Checkout to initiate the payment process. Finalising orders is simple and intuitive, ensuring a smooth experience for customers.
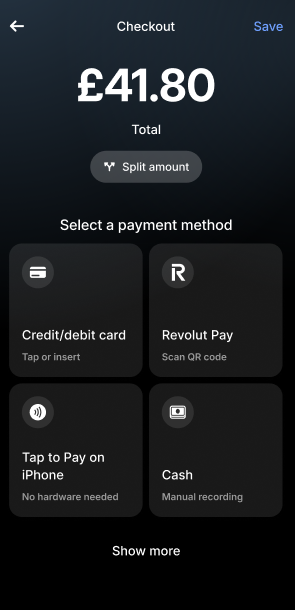
Split the bill
Splitting the bill makes it easy to manage payments when customers want to share costs. You can split the amount either by entering specific values or dividing it equally.
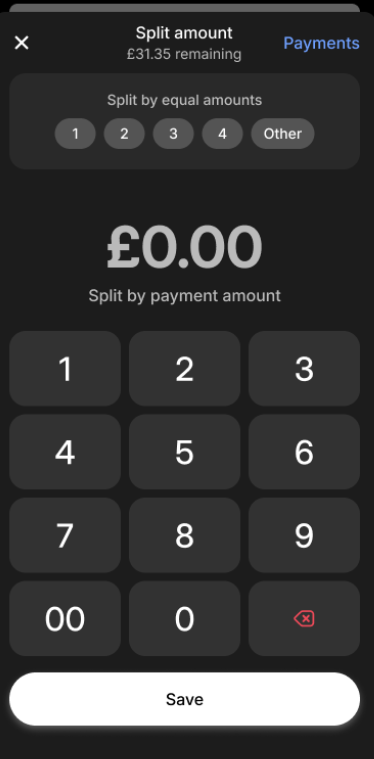
To split a bill:
- Tap
Split amounton the checkout screen. - Choose one of the two options:
- Enter an amount to manually specify how much each person pays.
- Split equally to divide the total evenly among participants.
- Continue with the payment.
You can also take partial payments and park the order again if needed.
Add tip
Adding a tip allows customers to show their appreciation for great service. To make tipping seamless, you can set preset percentage options for quick selection.
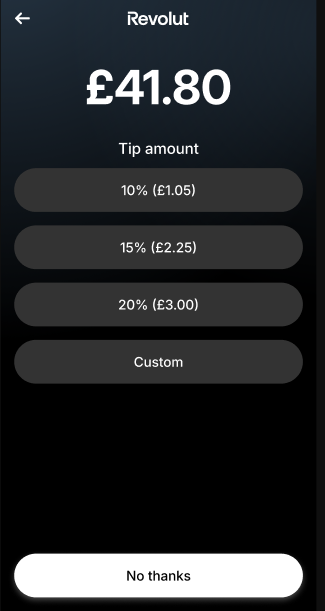
To add a tip:
- Tap
Add tipon the checkout screen. - Choose one of the following:
- Enter a fixed amount.
- Select a preset percentage (if configured).
- The tip will be added to the total automatically.
Select payment method
Offering flexible payment methods ensures a smooth checkout experience for your customers. Whether they prefer cards, QR codes, or alternative options, you can easily record their payments.
Credit/Debit Card: Process payments easily with the paired Revolut Reader.
Revolut Pay: Accept secure payments via QR code, powered by Revolut Pay.
Tap to Pay: Take payments directly via your iPhone.
noteTap to Pay functionality is only available on devices running iOS 16.4 or later. Ensure your device is updated to access this feature.
Cash: Record cash payments manually. While cash is accepted, Revolut keeps things simple by not offering cash management services.
Other tender: Use this option to record alternative payments, such as vouchers, deposits, or other non-standard methods.
You can manage and disable optional payment methods directly in the settings to tailor your checkout experience to your business needs. To do consult Operational settings: Checkout
Confirm payment
Once the payment method is selected, follow the on-screen instructions to complete the transaction.
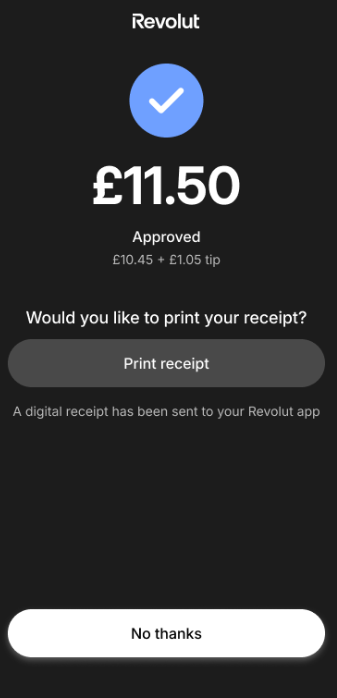
A receipt will be printed automatically (if configured) or can be printed manually from the payment confirmation screen. Optionally, you can send the receipt to the customer's email.