Set up payment methods and other options for the Revolut Gateway for WooCommerce plugin.
To configure the plugin, navigate to the settings page in your WooCommerce admin panel: Plugins > Installed Plugins > Revolut Gateway for WooCommerce > Settings.
To enable Revolut payment methods on your checkout page, you must connect your Revolut Merchant account via the plugin's API settings.
To connect your account, you need an active Revolut Merchant account, which is a sub-account of your Revolut Business or Revolut Pro account.
- If you don't have a Revolut Business account yet, you can sign up here.
- If you don't have a Revolut Pro account yet, you can sign up here.
- To learn more about the sign-up process and the difference between a Business and a Merchant account, see this page.
Connect your account
To use the Revolut Gateway for WooCommerce plugin, you need to connect your Revolut Merchant account. You can connect using OAuth or by entering your API key in the plugin's API settings.
The plugin only supports API key connection in Sandbox mode.
Connect with OAuth
OAuth provides an easier way to connect your Merchant account directly, without needing an API key. Follow these steps:
-
Log in to your WooCommerce dashboard as an admin.
-
Navigate to Plugins > Installed Plugins > Revolut Gateway for WooCommerce > Settings.
-
On the API settings tab, click Connect your Merchant account.
-
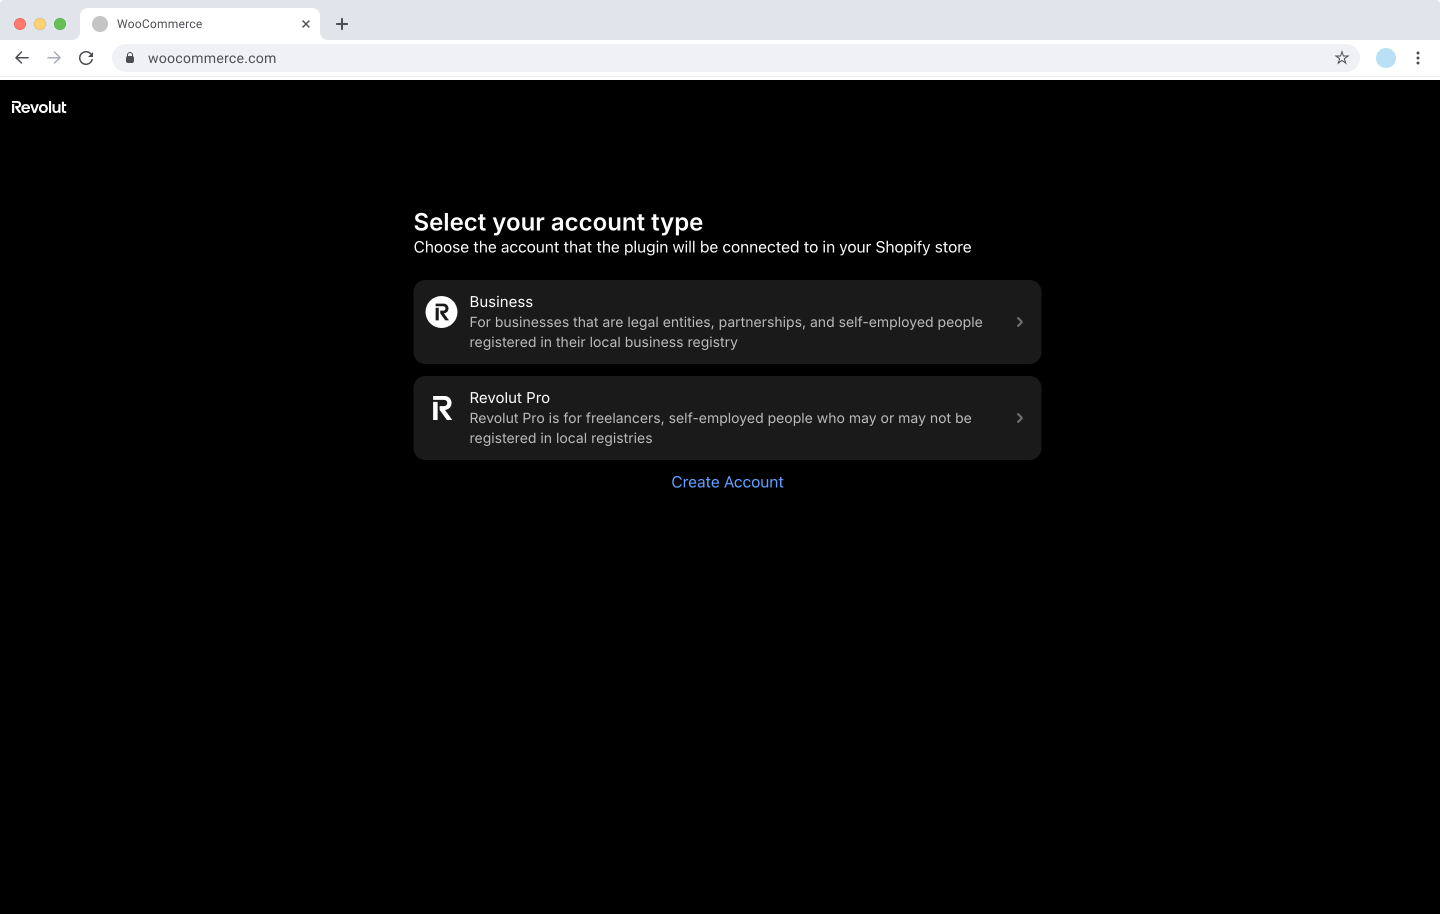
Select your account type:
- Business - for legal entities, partnerships, and self-employed people registered in a local business registry.
- Revolut Pro - for freelancers and self-employed people who may not be registered in local registries.
-
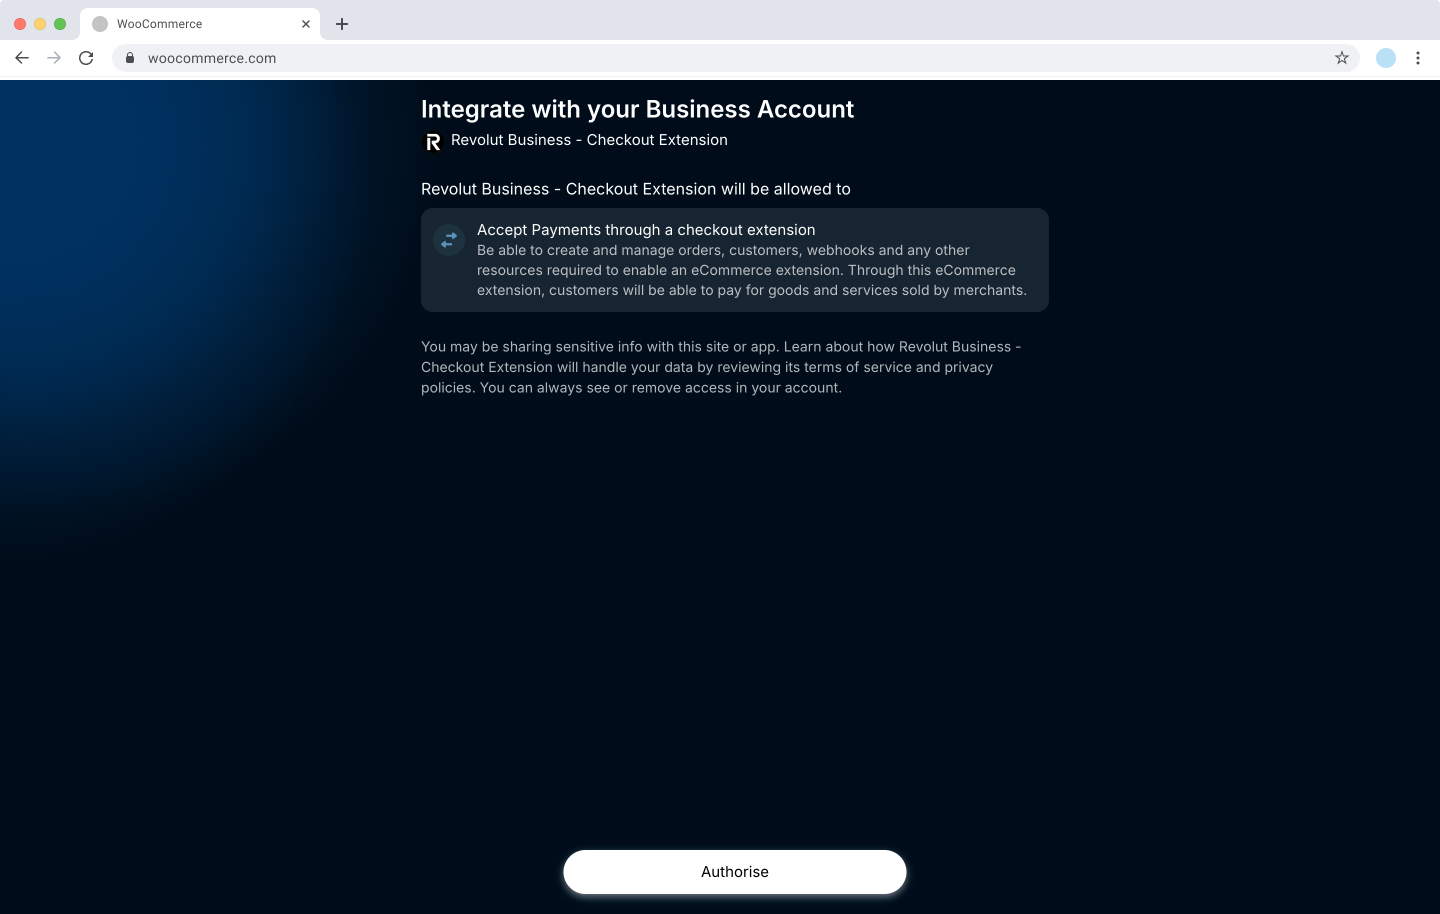
You will be redirected to an authorisation page. Click Authorise to grant the plugin access to your account.
-
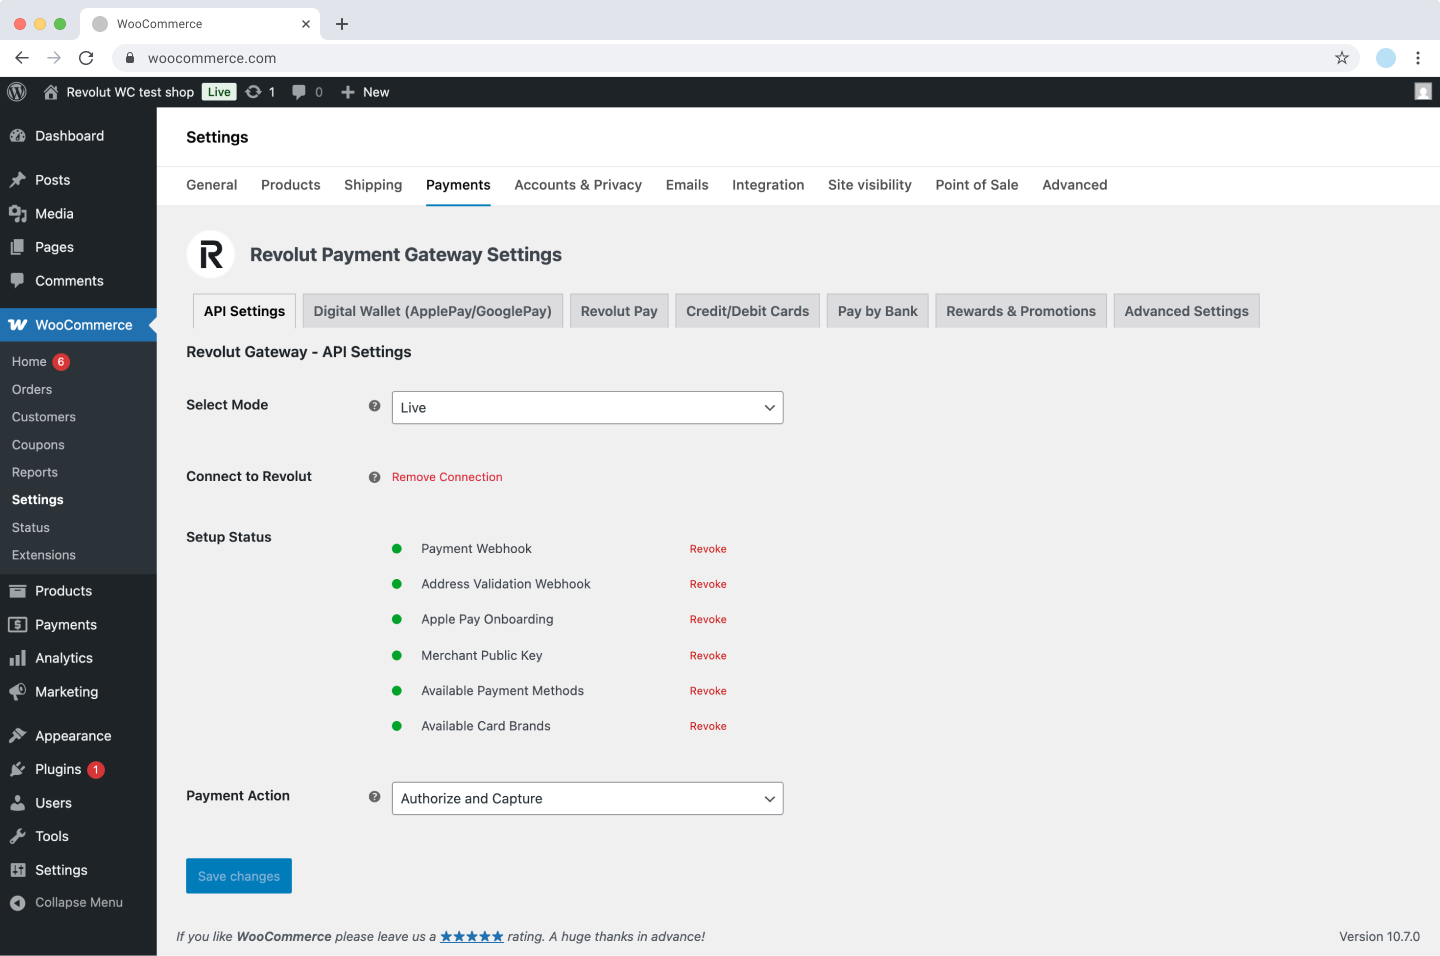
Once redirected back to WooCommerce, your account is connected.
You have successfully connected your account!
General configuration
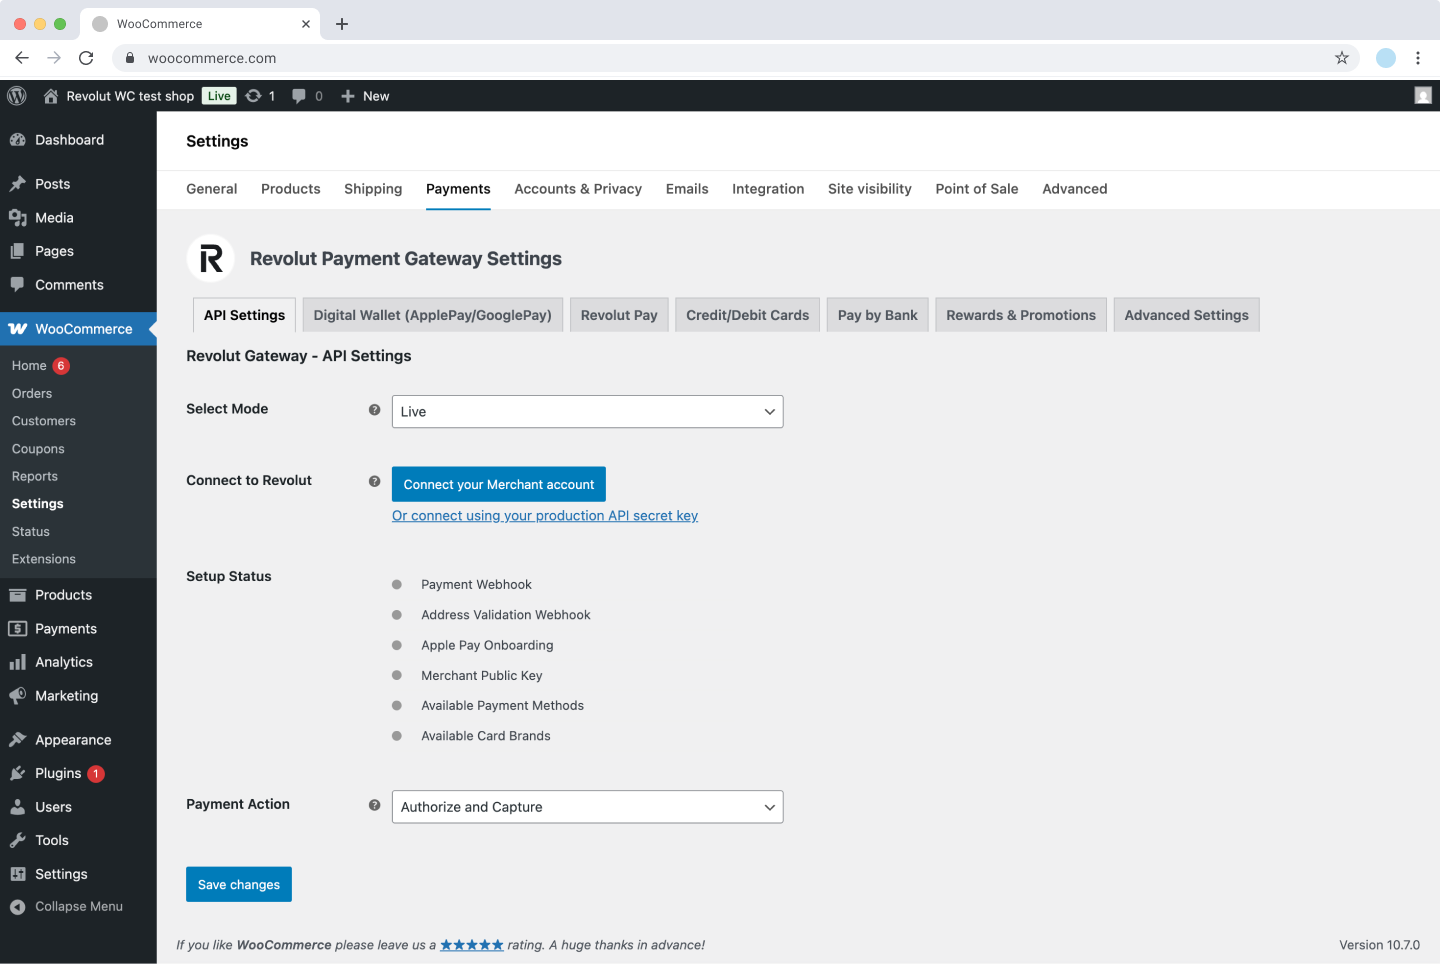
The API Settings tab provides essential settings for the Revolut Gateway integration with WooCommerce. You can select the environment you want to use, connect your Revolut Business or Revolut Pro account via OAuth or by providing your API key, and choose your preferred payment capture method.
These settings ensure your payment gateway operates correctly and securely, allowing you to test transactions, verify account connectivity, and decide whether to capture payments automatically or manually.
To access the API Settings, go to Plugins > Installed Plugins > Revolut Gateway for WooCommerce > Settings. You have the following configuration options available:
-
Select Mode: Controls if the Revolut Payment Gateway uses simulated or real transactions.
- Live: In this mode, your store will process real transactions. We recommend testing the plugin in Sandbox mode before going live.
- Sandbox: In this mode, your store will simulate all transactions. This will ensure that no real purchases are made through your store, so you can test all features before going live in production.
-
Connect to Revolut: Click Connect your Merchant account to connect via OAuth, or click Or connect using your production API secret key to enter an API key directly. For more information, see: Connect your account.
-
Setup Status: Displays the status of each required integration component after connecting your account. Each item shows a green or red indicator:
- Payment Webhook
- Address Validation Webhook
- Apple Pay Onboarding
- Merchant Public Key
- Available Payment Methods
- Available Card Brands
If any item shows red, click Retry next to it to attempt re-initialisation.
-
Payment Action: Select how payments are captured.
- Authorize and Capture: Payments are automatically authorised and captured at checkout.
- Authorize Only: Payments are authorised at checkout, and you have to capture them manually. For more information, see: Manual capture.
Configure payment methods
The Revolut Gateway for WooCommerce plugin supports multiple payment methods. You can enable or disable these payment methods from their respective tabs in the plugin settings.
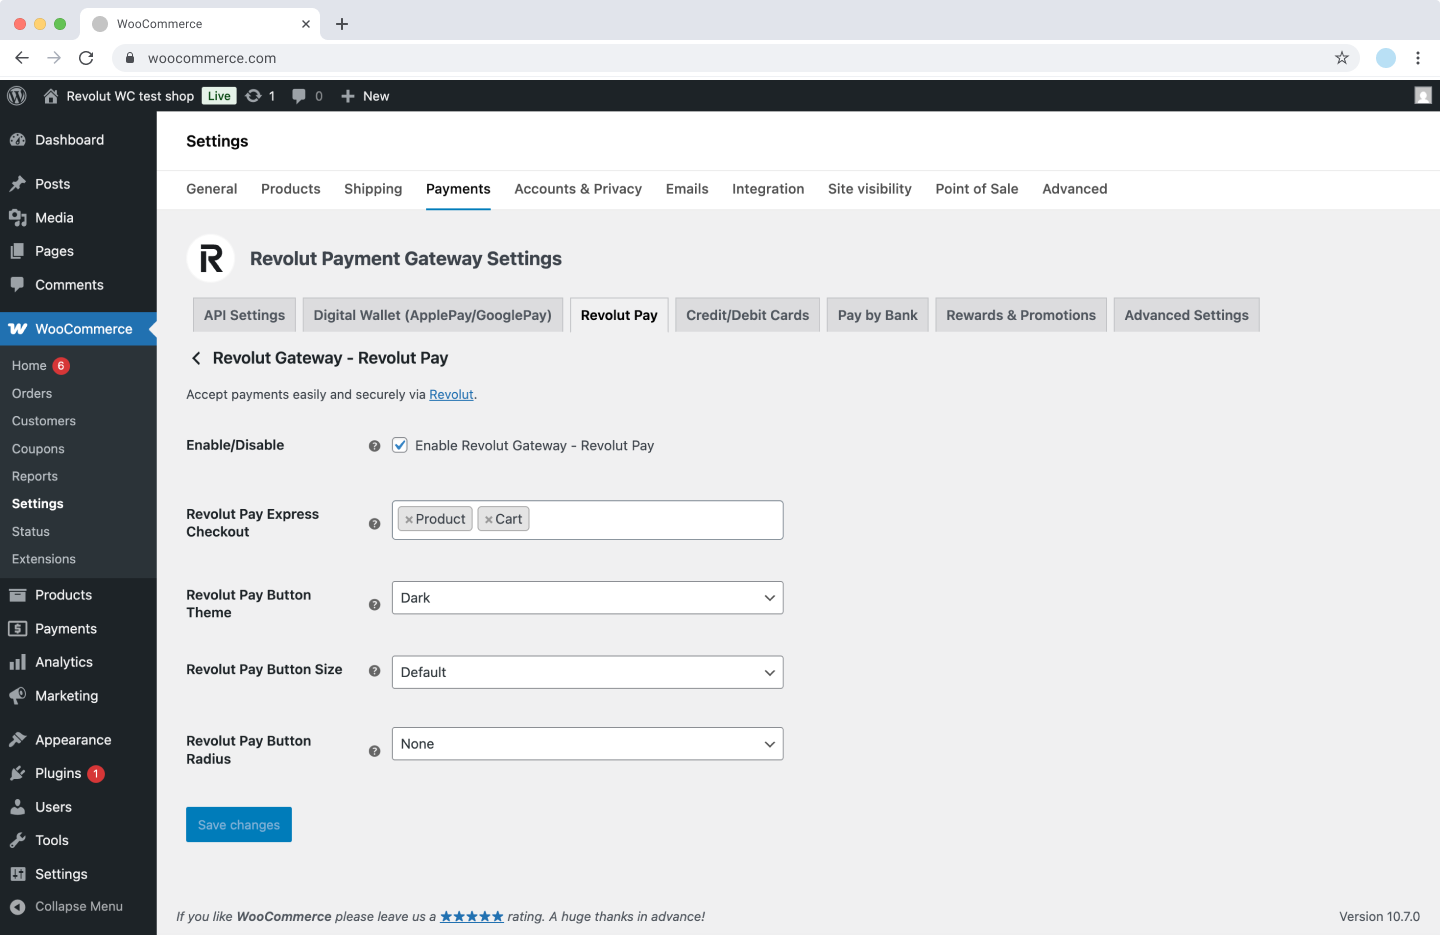
Revolut Pay
The Revolut Pay tab allows you to turn on or off Revolut Pay, which toggles the availability of Revolut Pay on your checkout page.
This option allows customers to use Revolut Pay during checkout if enabled. If disabled, this payment option will not appear at checkout.
To enable Revolut Pay:
- Log in to your WooCommerce dashboard as an admin.
- Go to Plugins > Installed Plugins > Revolut Gateway for WooCommerce > Settings > Revolut Pay.
- Check the Enable/Disable checkbox to enable Revolut Pay on your checkout page.
- Click Save changes to apply the changes.
Here is a complete list of available settings:
-
Enable/Disable: Toggle to enable or disable Revolut Pay on your checkout page.
-
Revolut Pay Express Checkout: Determine where the Revolut Pay button appears with the Fast checkout feature. You can select multiple options: Product, Cart.
If none is selected, Revolut Pay won't be available as a Fast checkout payment option on product and cart pages.
The Product and Cart locations are for the Fast checkout feature. For more information, see: Features: Fast checkout.
-
Revolut Pay Button Theme: Select the colour theme of the Revolut Pay button. Possible values: Dark, Light, Light-Outline.
-
Revolut Pay Button Size: Choose the size of the Revolut Pay button. Possible values: Default, Large, Small.
-
Revolut Pay Button Radius: Set the border radius of the payment button. Possible values: None, Small, Large.
Remember to click the Save changes button to apply changes.
Apple Pay and Google Pay
Apple Pay and Google Pay are only available in Live mode.
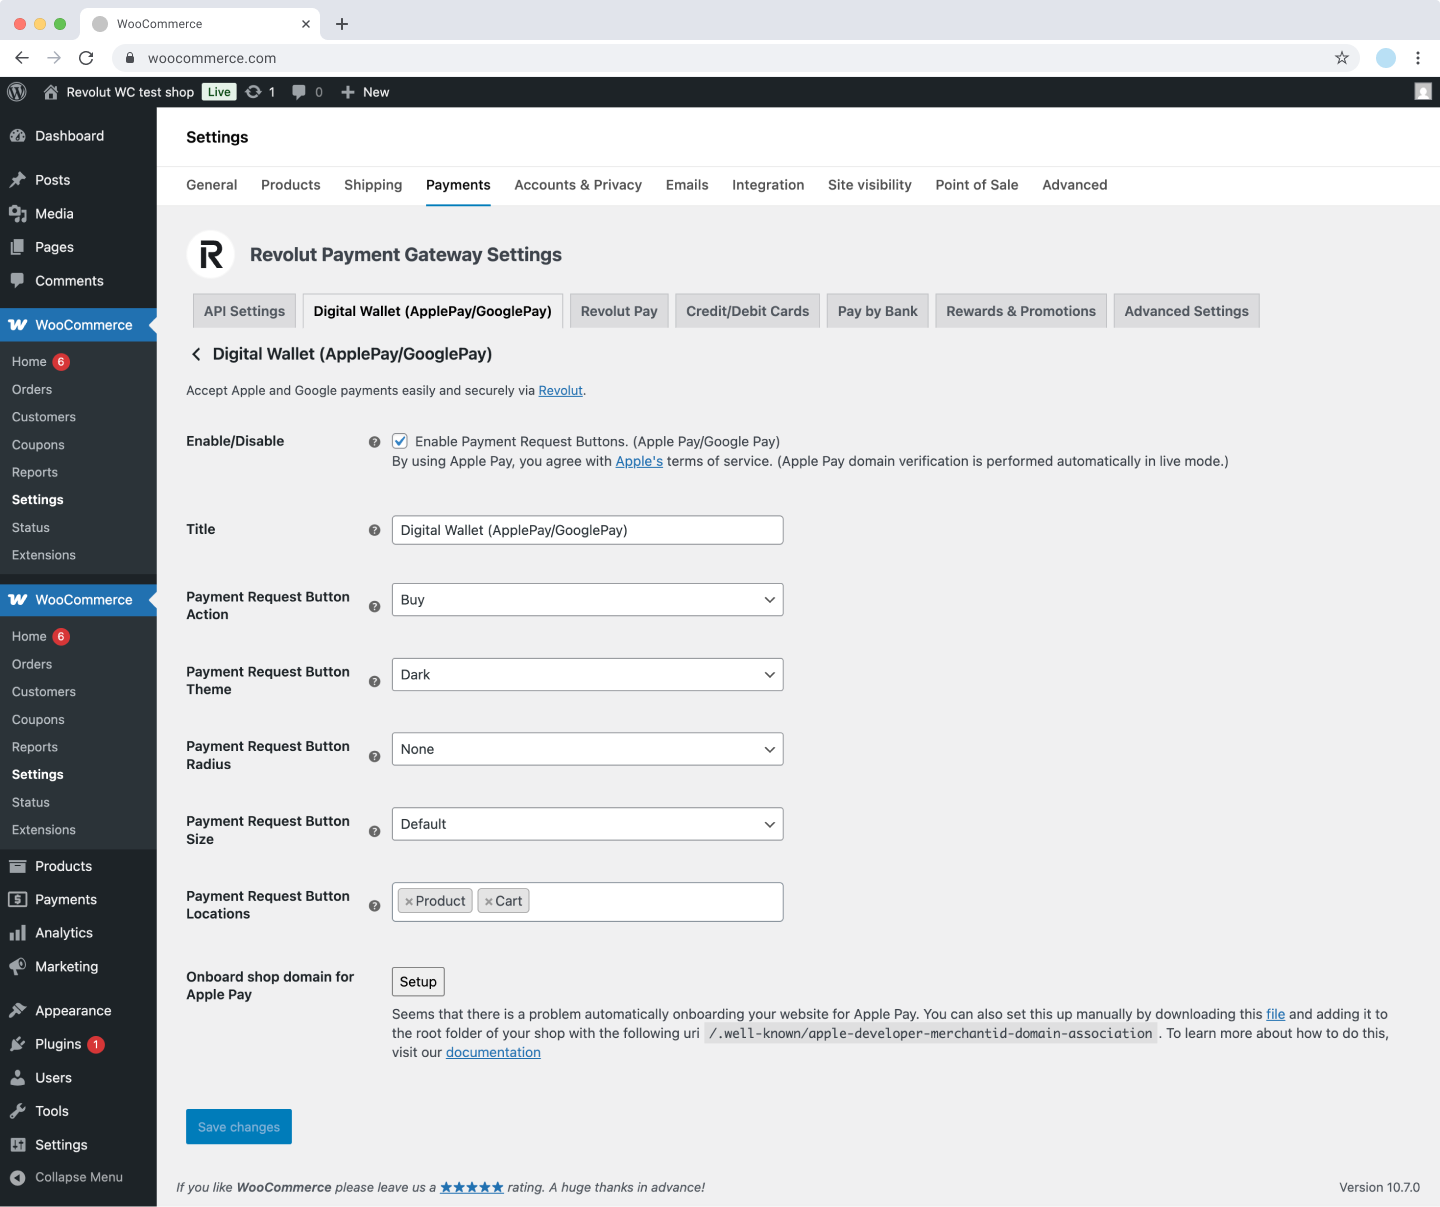
The Digital Wallet (ApplePay/GooglePay) tab allows you to turn on or off Apple Pay and Google Pay, which toggles the availability of Apple Pay or Google Pay buttons on your checkout page.
This option allows customers to use Apple Pay or Google Pay during checkout if enabled. If disabled, this payment option will not appear at checkout.
To enable Apple Pay and Google Pay:
- Log in to your WooCommerce dashboard as an admin.
- Go to Plugins > Installed Plugins > Revolut Gateway for WooCommerce > Settings > Digital Wallet (ApplePay/GooglePay).
- Check the Enable/Disable checkbox to enable Apple Pay and Google Pay on your checkout page.
- Click Save changes to apply the changes.
Here is a complete list of available settings:
-
Enable/Disable: Toggle to enable or disable Apple Pay and Google Pay on your checkout page.
-
Title: Change the display label of the payment method on the checkout page.
-
Payment Request Button Action: Choose the text displayed on the payment button. Possible values: Buy, Donate, Pay.
-
Payment Request Button Theme: Select the colour theme of the payment button. Possible values: Dark, Light, Light-Outline.
-
Payment Request Button Radius: Set the border radius of the payment button. Possible values: None, Small, Large.
-
Payment Request Button Size: Choose the size of the payment button. Possible values: Default, Large, Small.
-
Payment Request Button Locations: Determine where the payment button appears. You can select multiple options: Product, Cart.
The Product and Cart locations are for the Fast checkout feature. For more information, see: Features: Fast checkout.
-
Onboard shop domain for Apple Pay: Click Setup to register your shop domain for Apple Pay. Apple Pay domain verification is performed automatically in live mode. If there is a problem with automatic onboarding, you can download a verification file and add it to the root folder of your shop at
/.well-known/apple-developer-merchantid-domain-association.
Remember to click the Save changes button to apply changes.
Card payments
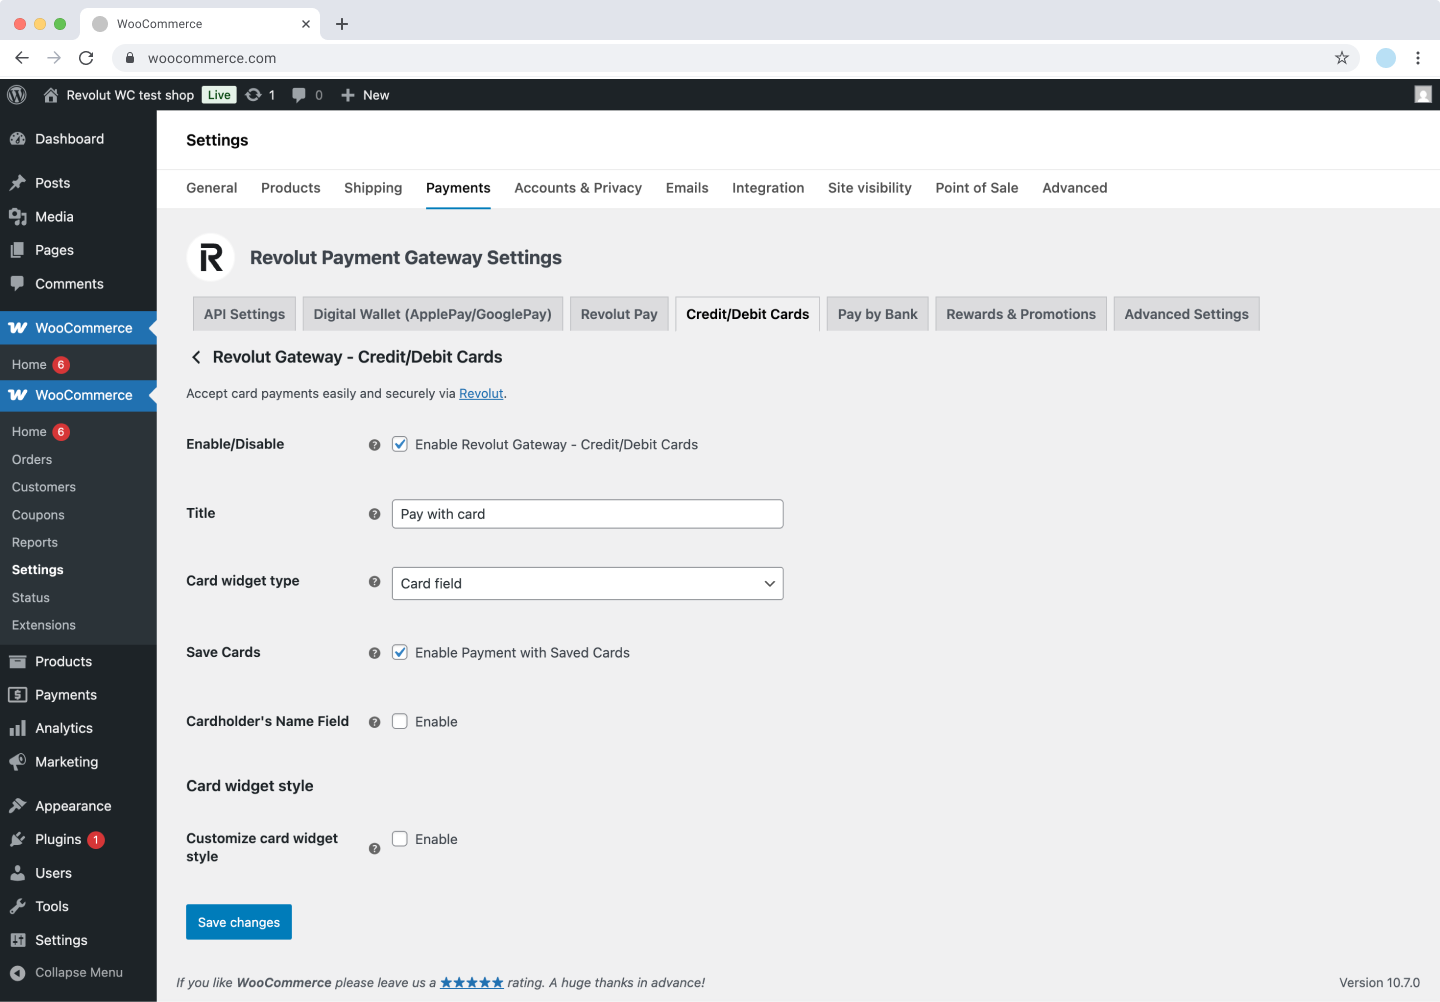
The Credit/Debit Cards tab allows you to turn on or off the card gateway, which toggles the availability of Revolut Card widget on your checkout page.
This option allows customers to use card payments during checkout if enabled. If disabled, this payment option will not appear at checkout.
To enable Card payments:
- Log in to your WooCommerce dashboard as an admin.
- Go to Plugins > Installed Plugins > Revolut Gateway for WooCommerce > Settings > Credit/Debit Cards.
- Check the Enable/Disable checkbox to enable the Card widget on your checkout page.
- Click Save changes to apply the changes.
Here is a complete list of available settings:
- Enable/Disable: Toggle to enable or disable card payments on your checkout page.
- Title: Change the display label of the payment method on the checkout page.
- Card widget type: Choose the type of the card payment widget. Possible values:
- Card field: Customers enter their card details directly on your checkout page in a card field.
- Pop-up: A pop-up window appears for customers to enter their card details.
- Save Cards: Enable this checkbox to allow customers to save their card details for future purchases.
For additional options to customise the Card field widget, such as the cardholder's name field and widget style customisation, see: Features: Customise the widget's style.
Remember to click the Save changes button to apply changes.
Pay by Bank
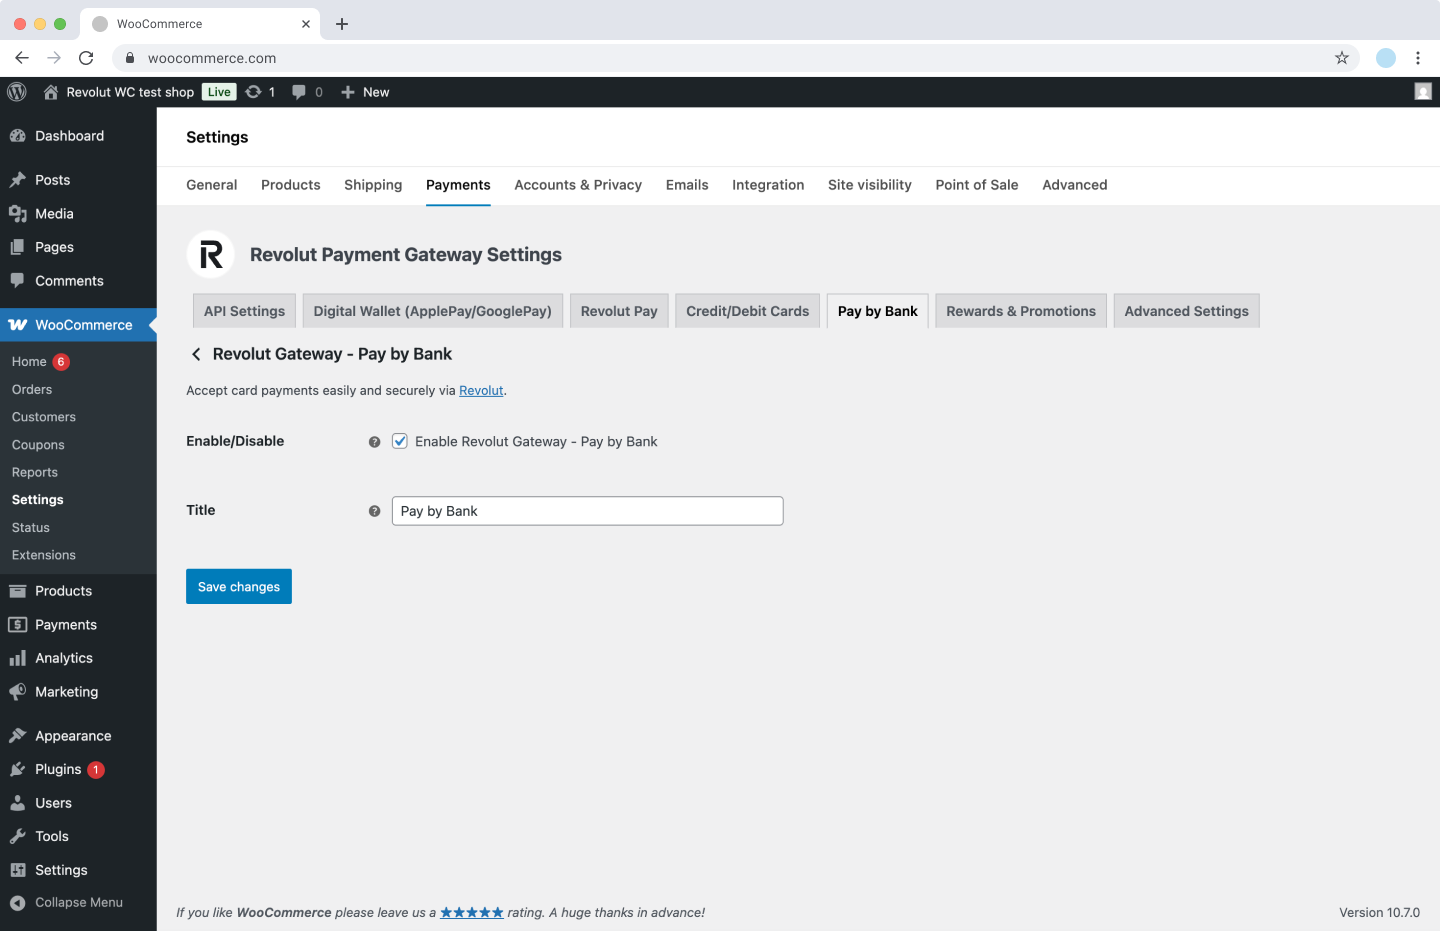
The Pay by Bank tab allows you to turn on or off the Pay by Bank gateway, which toggles the availability of Revolut Pay by Bank widget on your checkout page.
This option allows customers to use their bank accounts for payments during checkout if enabled. If disabled, this payment option will not appear at checkout.
To enable Pay by Bank:
- Log in to your WooCommerce dashboard as an admin.
- Go to Plugins > Installed Plugins > Revolut Gateway for WooCommerce > Settings > Pay by Bank.
- Check the Enable/Disable checkbox to enable the Pay by Bank widget on your checkout page.
- Click Save changes to apply the changes.
Here is a complete list of available settings:
- Enable/Disable: Toggle to enable or disable Pay by Bank on your checkout page.
- Title: Change the display label of the payment method on the checkout page.
Before implementing Pay by Bank, be aware of the following:
- No sandbox environment: Pay by Bank is not available in the sandbox environment. Real transactions must be made to test your implementation in the production environment.
- No refund support: Pay by Bank does not support refunds through the Merchant API. If you need to refund a payment, you must process it through alternate channels outside of Revolut's payment system.
- Pricing restrictions: Pay by Bank is not available for merchants on unblended pricing plans.
Additional settings
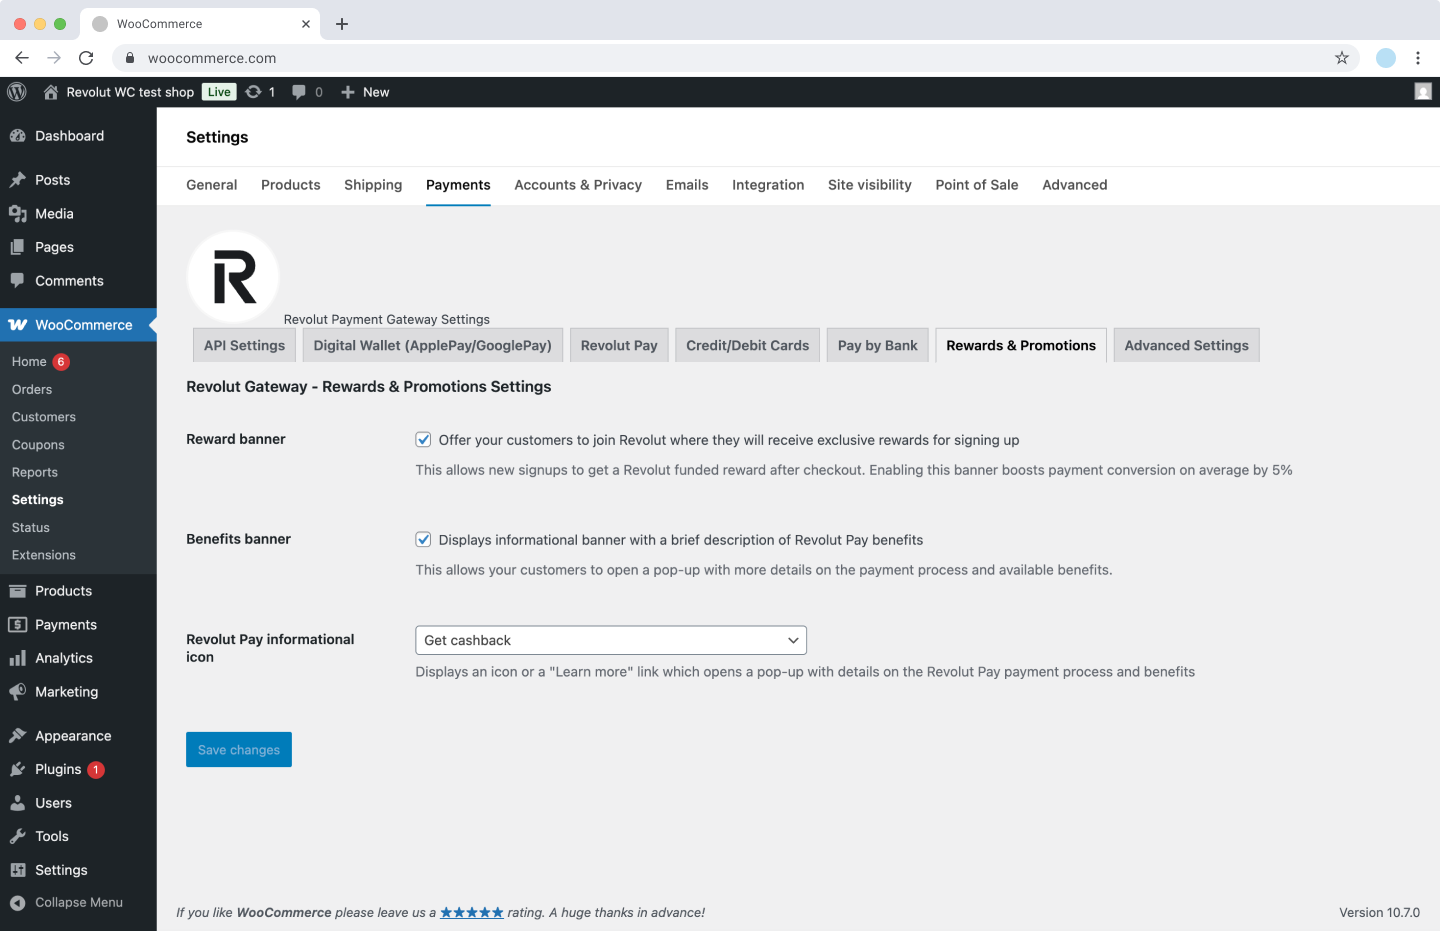
Rewards & Promotions
In the Rewards & Promotions tab, you can configure various promotional features and customer incentives for your Revolut Gateway integration.
We recommend implementing the Rewards & Promotions widget. Analysis has shown that having the widget can increase conversion to payment by ~5%.
To configure these settings:
- Log in to your WooCommerce dashboard as an admin.
- Go to Plugins > Installed Plugins > Revolut Gateway for WooCommerce > Settings > Rewards & Promotions.
- Toggle the desired options.
- Click Save changes to apply the changes.
These features help enhance the customer experience and promote the adoption of Revolut Pay on your WooCommerce store.
Here is a complete list of available settings:
-
Reward banner: Enable this option to display a banner inviting customers to join Revolut and receive exclusive rewards for signing up. The banner appears under the card widget during checkout and on the order confirmation screen.
If customers sign up using the banner during checkout, a confirmation banner is displayed on the order confirmation page. If they haven't signed up during checkout, they have another opportunity to do so on the order confirmation page. Enabling this option allows customers to pay via Revolut Pay more efficiently on their next visit.
-
Benefits banner: When enabled, this displays an informational banner describing the advantages of using Revolut Pay. The banner appears above the payment options on the checkout page or next to the Revolut Pay button as a fast checkout option.
Customers can access a pop-up containing detailed information about the payment process and available benefits.
-
Revolut Pay informational icon: Configure how additional information about Revolut Pay is presented on your checkout page. Available options:
- Learn more: Displays a "Learn more" text link that opens a pop-up explaining the benefits of Revolut Pay.
- Small icon: Displays a compact informational icon that opens a pop-up with detailed benefits.
- Get cashback: Displays a message about a cashback offer for new users.
- Disabled: Removes the informational element from the checkout page.
Advanced settings
In the Advanced Settings tab, you can manage additional plugin options.
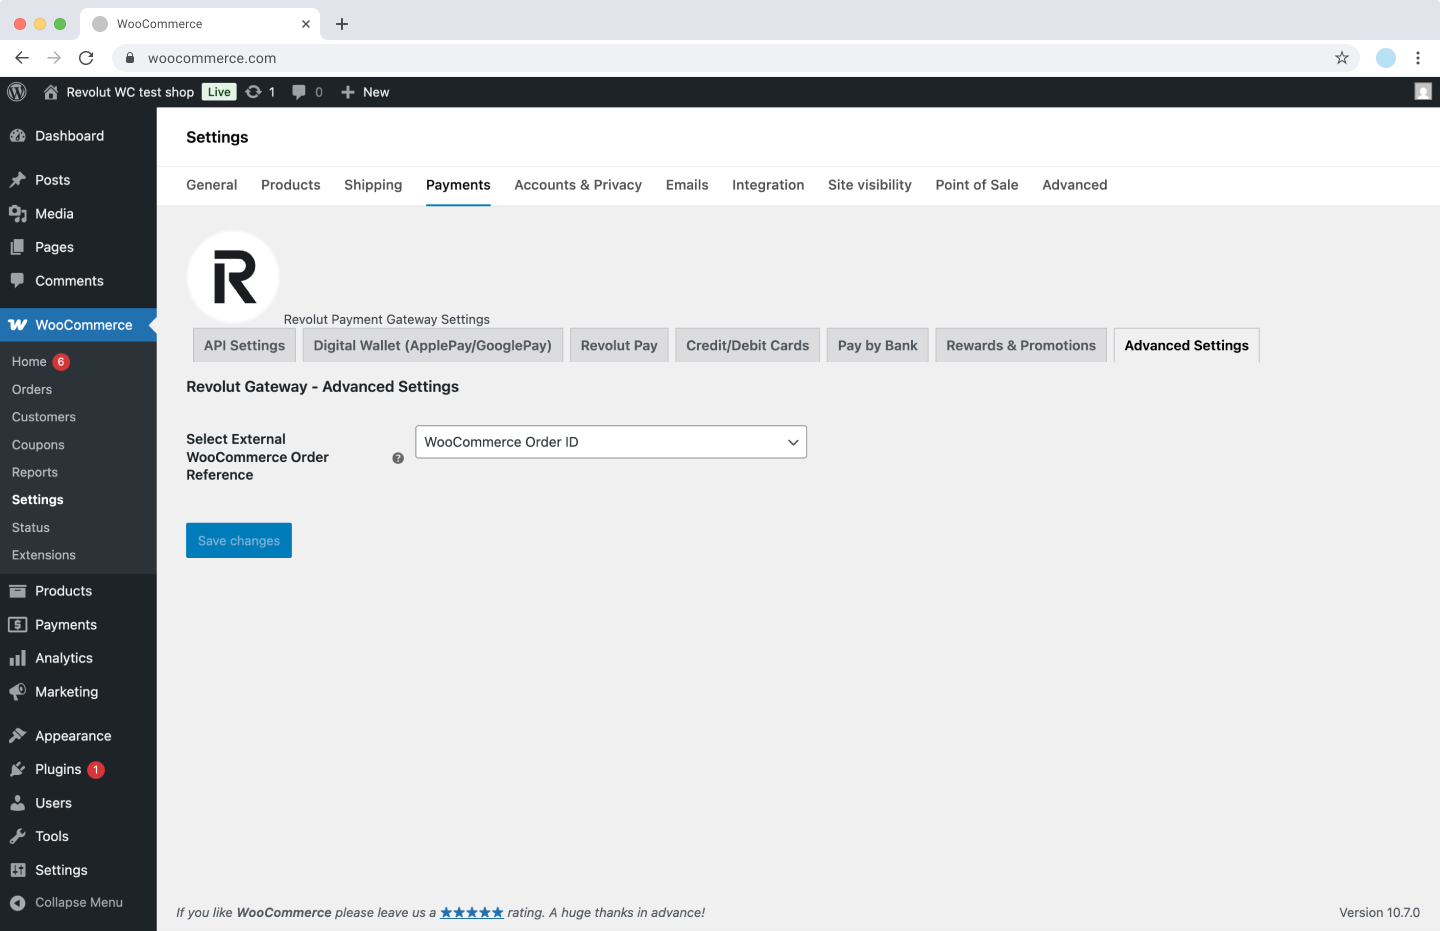
- Select External WooCommerce Order Reference: Choose which identifier is used for external references to simplify payment reconciliation. Select WooCommerce Order ID for the default ID assigned by WooCommerce (e.g.,
105), or WooCommerce Order Number if you use a plugin to modify it (e.g.,INV-105or105-EU).
Disable WooCommerce Blocks
Follow these steps to turn off WooCommerce Blocks and switch back to classic checkout:
-
Log in to your WooCommerce dashboard as admin.
-
Navigate to Pages and open the Checkout page with the editor.
-
Scroll down to the Payment options section and select the block.
-
On the right side panel, switch to the Block tab.
-
Click Switch to classic checkout button and save your changes.

Test your configuration
After configuring the plugin, you can start testing payments using our test cards if you're in Sandbox mode.
Use your Sandbox API Secret key in Sandbox mode.
Start accepting payments
Once you're satisfied with your configuration and testing, switch to Live mode to start accepting real payments in your WooCommerce store.
Use your Production API Secret key in Live mode.
You're all set! Your WooCommerce store is now configured to accept payments via Revolut.