You need the following Platform permissions to be able to configure the Business API:
- API & Integrations:
- Manage Integrations
- Manage API
- Billing:
- View Business
These steps apply to both the Sandbox and Production environments.
To make your first API request, complete the initial setup, following this high-level procedure:
- Generate and upload your certificate to authorize your application to access your Revolut Business account via the Business API.
- Provide a client assertion JWT to obtain a signing key.
- Consent to the application in the Revolut Business app to obtain an authorization code.
- Exchange authorization code for access token to authenticate your requests to the Business API.
- Try your first API request to get a list of all your accounts.
After you complete and validate the setup, you can make requests to the Business API. If you encounter issues, such as your access token has expired, see the Troubleshooting section.
1. Add your certificate
Authorize your application to access your Revolut Business account via the Business API. To do this, first generate your certificate and upload it on the Business API settings page of the Revolut Business app.
Generate a private and a public certificate
To generate the certificates, you need a Command Line Interface (CLI), for example, Terminal on macOS. For Windows, we recommend that you install WSL to run the commands.
Remember to press Enter after pasting each command, to make sure each line is executed.
-
Open your preferred CLI.
-
In your CLI, navigate to the directory in which you want to save the certificates.
cd <INSERT_DIRECTORY> -
To create a private and a public certificate, paste this command in your CLI and press Enter.
openssl genrsa -out privatecert.pem 2048 openssl req -new -x509 -key privatecert.pem -out publiccert.cer -days 1825You will be asked to enter some details about your organization for the certificate's "Distinguished Name". The prompts below will appear line by line.
Country Name (2 letter code) []: State or Province Name (full name) []: Locality Name (eg, city) []: Organization Name (eg, company) []: Organizational Unit Name (eg, section) []: Common Name (eg, fully qualified host name) []: Email Address []:Enter each piece of information and press Enter until you get back to the command prompt.
Optionally, you can leave some fields blank. However, for the public certificate to be generated successfully, you must enter at least one piece of information, for example, Country Name.
The certificates are generated and saved to the directory you chose in step 2.
To display the contents of your certificate in your CLI, run:
cat publiccert.cerAlternatively, you can open the certificate file with a text editor and copy its contents from there.
Copy the whole contents of the public certificate and leave the CLI open. You'll need them both in later steps.
To amend the information, rerun the steps above to overwrite the certificate with a new one.
Upload your certificate
To upload the generated certificate, copy and paste the content of publiccert.cer into the required field.
-
Go to the API settings.
Log in to the Revolut Business web app, and go to the Business API settings.
To open the settings manuallyIn the web app, click on the gear icon in the top right corner. Then, go to APIs → Business API.
-
In the API Certificates section, click Add API certificate to add your first certificate.
If you already have other certificates added, click Add new.
-
Copy and paste the content of
publiccert.certo the X509 public key field.Make sure that you copy the whole output, including the
-----BEGIN CERTIFICATE-----and-----END CERTIFICATE-----lines. -
Specify the OAuth redirect URI (in this example we use:
https://example.com).This is the URL where you are redirected after you consent for the application to access your Revolut Business account. You must use the same domain here and in the
issparameter provided in substep 3 of Generate a client assertion.For testing purposes, you only need it to retrieve the
codeparameter from this URL later, so you can use any URL. -
Give your certificate a meaningful title. It will help you later to distinguish it from other certificates.
-
Click Continue. This opens the API Certificate details with the parameters of your application.
-
Copy the
ClientIDshown in those detail. You will need it in the following steps.
Optionally, provide a list of IP addresses for additional security. If provided, only traffic from these IP addresses will be allowed.
Single IP addresses as well as IP pools in CIDR notation are allowed. Make sure that the IPs you provide are not local (i.e. private) IP addresses.
2. Generate a client assertion
In order to grant the consent to your application, you will need to generate a client-assertion JWT (JSON Web Token) which is cryptographically signed with your private certificate generated in step 1.
This JWT will be used whenever a new access token needs to be requested, and it is composed of a header, a payload and a signature.
See examples for the header and the payload, and the format of the parameters
JWT Header:
{
  "alg": "RS256",
  "typ": "JWT"
}JWT Payload:
{
  "iss": "example.com",
  "sub": "zfTKV9Eie_XLHl03f2Y7vJYDe5Klr6Y54v8fsp4Gvgp",
  "aud": "https://revolut.com",
  "exp": 1706136791
}The payload parameters must meet the following format:
| Field | Description | Format | Required |
|---|---|---|---|
iss | Domain from your OAuth redirect URI (provided in substep 4 of Upload your certificate) without https://. | String | Yes |
sub | Your client_id | String | Yes |
aud | https://revolut.com | String | Yes |
exp | JWT expiration date. Example for 90 days in the future: 1706136791. You can use this converter to provide the UNIX timestamp. | Number, in UNIX timestamp format, given in seconds | Yes |
Do not provide the exp value as a string!
There are several libraries to generate a JWT. To manually generate the JWT from your CLI, perform the following steps:
-
Go back to your CLI.
Make sure that you are in the same directory where you saved your
privatecert.pemfile from step 1. If you want to use a different directory, make sure that you copy the private certificate there. -
Prepare the JWT header and save it as
header.json.Paste this command into your CLI and press Enter.
cat <<EOF > header.json { "alg": "RS256", "typ": "JWT" } EOF -
Prepare the JWT payload and save it as
payload.json. Replace the placeholders in angle brackets (<>) with your own values. Also, make sure that theexpvalue is a number, not a string.Replace the placeholders in the payload below with your own values, then copy and paste the command into your CLI and press Enter.
cat <<EOF > payload.json { "iss": "<your domain without https://>", "sub": "<your client_id>", "aud": "https://revolut.com", "exp": <unix timestamp in seconds> } EOF -
Generate the signed JWT and save it as
client_assertion.txt.Run this set of commands in your CLI. Remember to press Enter after pasting, otherwise it might not run fully, resulting in the signature missing.
# Add encoded and normalised header
cat header.json | tr -d '\n' | tr -d '\r' | openssl enc -base64 -A | tr +/ -_ | tr -d '=' > client_assertion.txt
echo -n "." >> client_assertion.txt
# Add encoded and normalised payload
cat payload.json | tr -d '\n' | tr -d '\r' | openssl enc -base64 -A | tr +/ -_ | tr -d '=' >> client_assertion.txt
# Generate signature
cat client_assertion.txt | tr -d '\n' | tr -d '\r' | openssl dgst -sha256 -sign privatecert.pem | openssl enc -base64 -A | tr +/ -_ | tr -d '=' > sign.txt
echo -n "." >> client_assertion.txt
# Add signature
cat sign.txt >> client_assertion.txt
A client_assertion.txt file containing the client assertion JWT is created in your chosen directory.
To display the contents of your JWT in the CLI, run:
cat client_assertion.txtNever share your client-assertion JWT (JSON web token) and refresh_token with anyone, as these can be used to access your banking data and initiate transactions.
You can validate the JWT that you just generated at jwt.io:
- Paste the contents of the
client_assertion.txtfile into the Encoded Token field. - In the JWT Signature Verification section, paste the contents of the
publiccert.cerfile into the Public Key field. - Check that the JWT is decoded correctly and the signature is verified.
This only checks if the JWT is well-formed, if the header and payload have been correctly signed, and if the signature matches the provided certificate.
3. Consent to the application
-
Go back to the API settings.
Log back in to the Revolut Business web app, and go to the Business API settings again.
-
Select the certificate you want to edit.
-
In the API Certificate details, copy your client ID from the ClientID field.
-
Click Enable access. This takes you to the
/app-confirmendpoint where you grant your application access to your account via the Business API. See an example below.https://business.revolut.com/app-confirm?client_id=<ClientID>&redirect_uri=https://example.com&response_type=codeOptionallyYou can narrow down the security permissions of the consent by adding to this URL the
scopequery parameter with a comma separated list of the desired scopes as its value. For example:(...)&response_type=code&scope=READ,WRITE. -
Click Authorise. This triggers a 2-factor authentication (2FA) process.
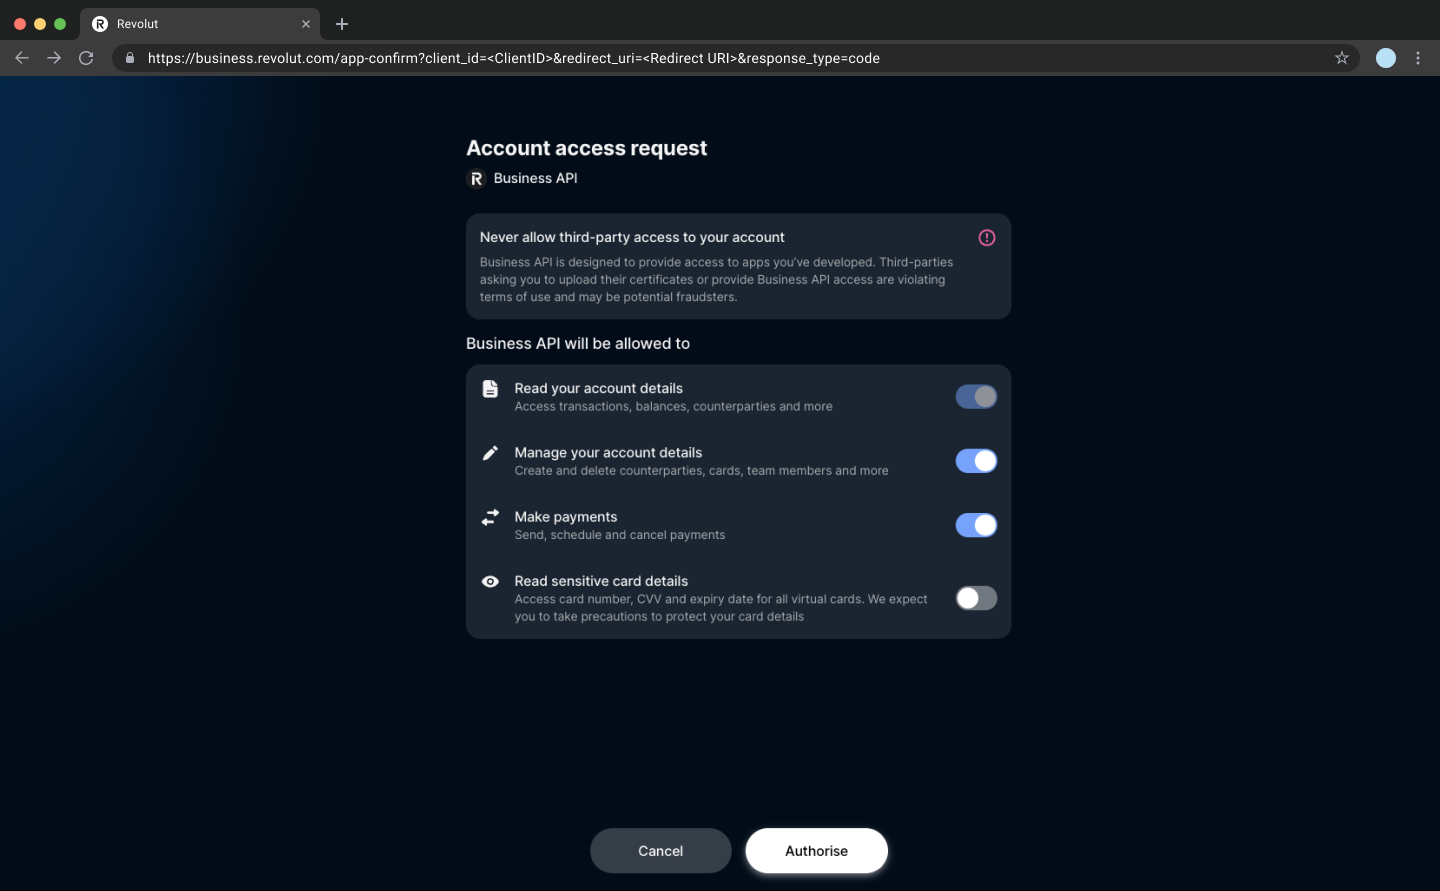
On successful authorisation, you are redirected to the
OAuth redirect URIthat you specified. -
Get the authorization code (
code) from the redirect URI.https://example.com?code=oa_prod_vYo3mAI9TmJuo2_ukYlHVZMh3OiszmfQdgVqk_gLSkUFor security reasons, the authorization code is only valid for two minutes.
If it expires before you use it, you must repeat the substeps 4-6 of Consent to the application to generate a new one.
4. Exchange authorization code for access token
To exchange the authorization code (code) for an access token (access_token), make the following cURL call, for example, from your CLI:
curl https://b2b.revolut.com/api/1.0/auth/token \
  -H "Content-Type: application/x-www-form-urlencoded"\
  --data "grant_type=authorization_code"\
  --data "code=<INSERT_AUTHORIZATION_CODE>"\
  --data "client_assertion_type=urn:ietf:params:oauth:client-assertion-type:jwt-bearer"\
--data "client_assertion=<INSERT_JWT>"Request fields (URL-encoded) - details
See what the particular fields mean, how their values should be formatted, and whether they must be included in the request or if they can be skipped:
| Field | Description | Format | Required |
|---|---|---|---|
grant_type | The OAuth grant type: authorization_code. | String | Yes |
code | The authorization code obtained from the redirect URI in step 3. | String | Yes |
client_assertion_type | The type of the client assertion: urn:ietf:params:oauth:client-assertion-type:jwt-bearer. | String | Yes |
client_assertion | The JWT token that you generated in step 2. | String | Yes |
A successful response returns the access token with its type and expiry time in seconds, and the refresh token, which does not expire.
{
  "access_token": "oa_prod_rPo9OmbMAuguhQffR6RLR4nvmzpx4NJtpdyvGKkrS3U",
  "token_type": "bearer",
  "expires_in": 2399,
  "refresh_token": "oa_prod_hQacSGnwx-luIfj3dlVByrytVV9rWAnyHkpJTwG_Tr8"
}Every access token is only valid for 40 minutes.
After the access token expires, you must request a new one, using the refresh token (refresh_token) and the JWT (client_assertion.txt).
For more information, see the Troubleshooting section: Access token expired.
5. Try your first API request
To verify that everything is working, make a request to the /accounts endpoint to get a list of all your accounts using the access token which you obtained in the previous step:
curl https://b2b.revolut.com/api/1.0/accounts \
-H "Authorization: Bearer <your access_token>"On success, you get a response similar to this one:
[
  {
    "id": "2a0d4d03-e26c-4159-9de1-c6bf3adfd8a1",
    "name": "Current GBP account",
    "balance": 100.0,
    "currency": "GBP",
    "state": "active",
    "public": false,
    "updated_at": "2017-06-01T11:11:11.1Z",
    "created_at": "2017-06-01T11:11:11.1Z"
  },
  {
    "id": "df8d6b20-0725-482e-a29e-fb09631480cf",
    "name": "EUR expenses account",
    "balance": 1234.0,
    "currency": "EUR",
    "state": "active",
    "public": false,
    "created_at": "2017-06-01T11:11:11.1Z",
    "updated_at": "2017-06-01T11:11:11.1Z"
  }
]Congratulations! You're ready to make requests to the Business API with an access token.
Troubleshooting
Access token expired
When the access token expires, you won't be able to make successful API calls and will get the 401 Unauthorized error in response:
{"message":"The request should be authorized."}To regain access, you must first request a new access token using the refresh token (returned in step 4) and the JWT (obtained in step 2).
Get a new access token
To request a new access token, make the following request.
Refreshing an access token invalidates the previous token.
This means that if you have an access token that hasn't expired yet and you refresh it with your refresh token, your existing access token will no longer work, and you will need to switch to the new access token.
curl https://b2b.revolut.com/api/1.0/auth/token \
  -H "Content-Type: application/x-www-form-urlencoded"\
  --data "grant_type=refresh_token"\
  --data "refresh_token=<insert refresh_token>"\
  --data "client_assertion_type=urn:ietf:params:oauth:client-assertion-type:jwt-bearer"\
--data "client_assertion=<insert JWT>"Request fields (URL-encoded) - details
See what the particular fields mean, how their values should be formatted, and whether they must be included in the request or if they can be skipped:
| Field | Description | Format | Required |
|---|---|---|---|
grant_type | The OAuth grant type: refresh_token. | String | Yes |
refresh_token | The refresh token. | String | Yes |
client_assertion_type | The type of the client assertion: urn:ietf:params:oauth:client-assertion-type:jwt-bearer. | String | Yes |
client_assertion | The JWT token that you generated in step 2. | String | Yes |
A successful response returns a new access token with its type and expiry time in seconds.
{
  "access_token": "oa_prod_rPo9OmbMAuguhQffR6RLR4nvmzpx4NJtpdyvGKkrS3U",
  "token_type": "bearer",
  "expires_in": 2399
}Client assertion JWT expired
Similarly to the access token, when you create a JWT in step 2, it also has an expiration date specified in the exp field.
If you refresh the access token with an expired JWT, you will get an error response like this:
{
    "error": "invalid_request",
    "error_description": "The Token has expired on Mon Jun 03 15:55:21 UTC 2024."
}In this case, you must generate a new JWT by following the instructions in step 2. Make sure to use the same private key as before.
For security reasons, it is recommended that you provide a short expiration date when generating the JWT, just enough to refresh the access_token.
This reduces the risk in the event the JWT gets leaked.
What's next
- See the API Reference for full details on different endpoints of the Business API.
- Browse our guides to learn how to use various Business API endpoints.
- See the API usage and testing section for developer-specific details.