Table service
The Table service feature helps restaurants and similar businesses manage tables and orders more effectively. It provides tools to organise your floor plan, assign orders to tables, and keep track of table and order statuses in real-time.

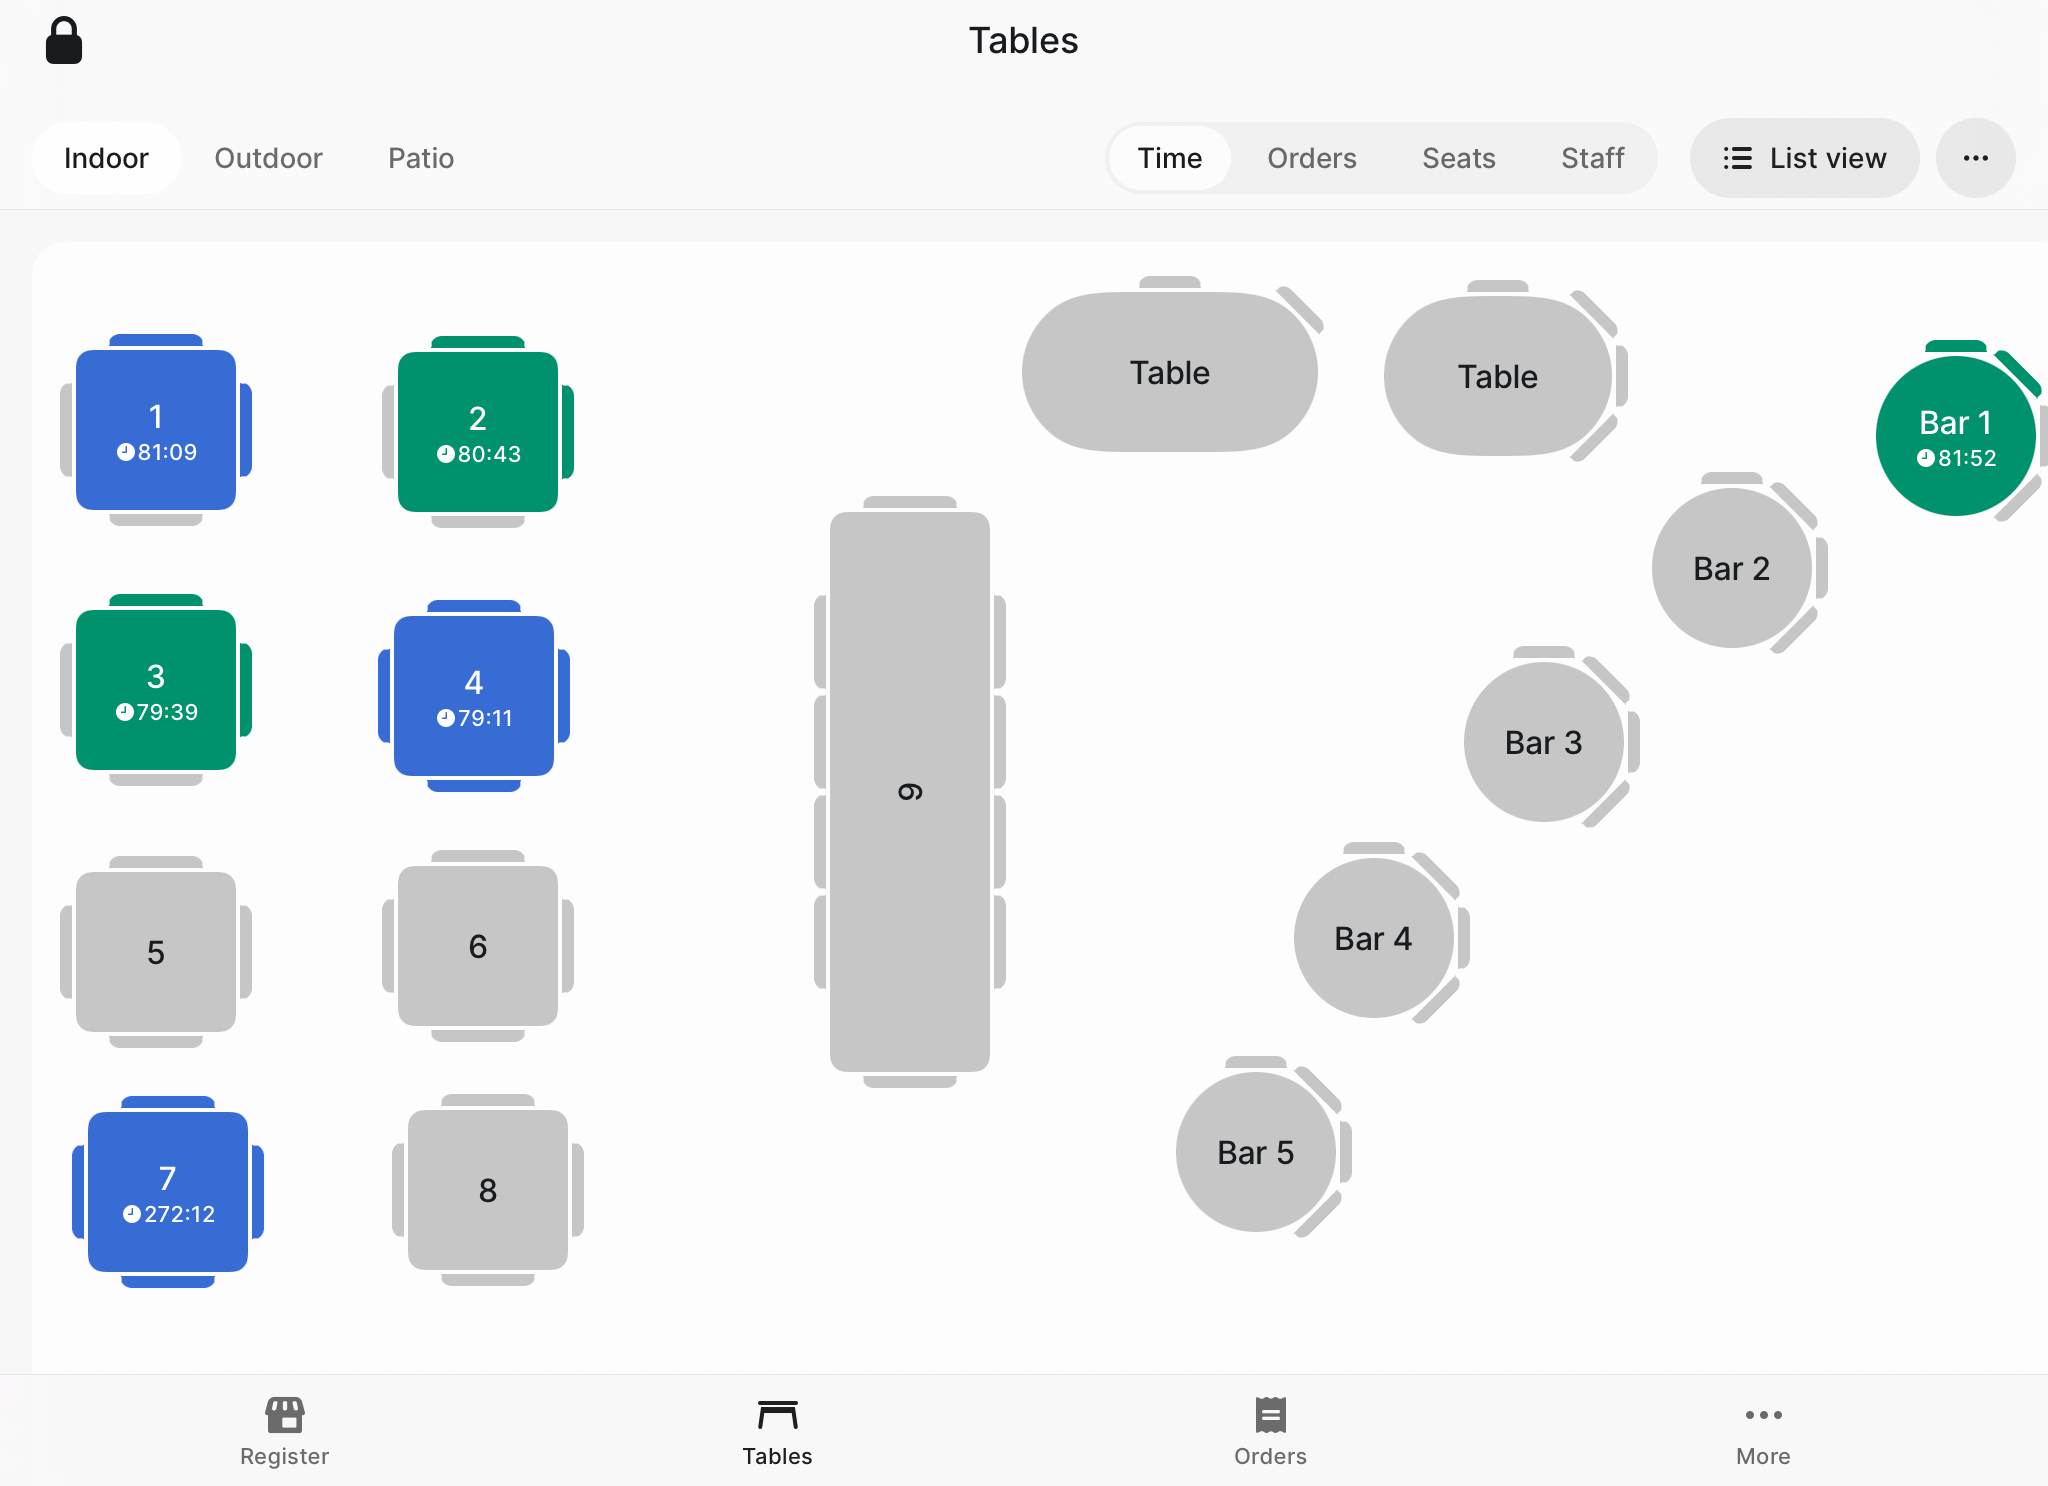
On iPad, you'll see a visual floor plan. On iPhone, the tables are shown in a list view for easier navigation.
The floor plan must be created on the iPad before it can be accessed on the iPhone.
With Table service, you can:
- Create and manage a floor plan for your restaurant.
- Assign tables to customers and track their status in real-time.
- Handle orders and process payments directly from the app.
This feature is designed to simplify table management and improve overall efficiency for your staff.
Set up table service
Enable table service
To use the Table service feature, you first need to enable it in the app settings:
- Open the Revolut POS app on your iPad.
- Go to More > Store.
- Toggle Enable table service to enable the feature.
Once enabled, you'll be able to create and manage your floor plan and start assigning tables to orders.
Edit floor plan
Creating and editing floor plan is only available in the iPad app.
The floor plan allows you to organise your restaurant layout in the iOS app. You can define sections, add tables, and set up your workspace.
- Navigate to Tables in the app menu.
- Tap > Edit floor plan to start editing your floor plan.
- To create a plan for the different areas of your restaurant:
- Tap
Add newin the bottom and select Section. - Enter the Name of your new section (e.g., "Patio", "Main Dining").
- Tap
Save.
- Tap
- To add tables within each section:
- Select the section you want to add a new table.
- Tap
Addin the bottom and select Table. - Enter a table name or number (e.g., "4", "Patio table 1").
- Choose the number of seats.
- Choose the shape of the table by selecting one from the list.
- Adjust the size and orientation using the drag handle.
- Tap anywhere on the floor plan to leave the table editing.
- Drag and drop the newly created table to position it within the section layout.
- Repeat these steps to add more tables as needed.
Use table service
Table statuses
The Revolut POS app uses color-coded indicators to show the status of each table on the floor plan. These indicators help staff quickly identify table availability and manage seating efficiently:
| Table colour | Description |
|---|---|
| Grey | The table is available and ready for new customers. |
| Green | The table has been paid for or no items have been added, but it hasn't been marked as free yet. |
| Blue | The table is currently occupied. |
Open a table
- Tap on an available table on the floor plan.
- Enter a name to the table (optional), by default it's the table number.
- Adjust the number of guests for the table.
- Tap
New order.
Once assigned, your product catalogue will open to start taking orders for the table. The table status will change to blue , indicating it is now occupied.
Manage tables and orders
-
Tap on a table on your floor plan to start or continue taking orders.
-
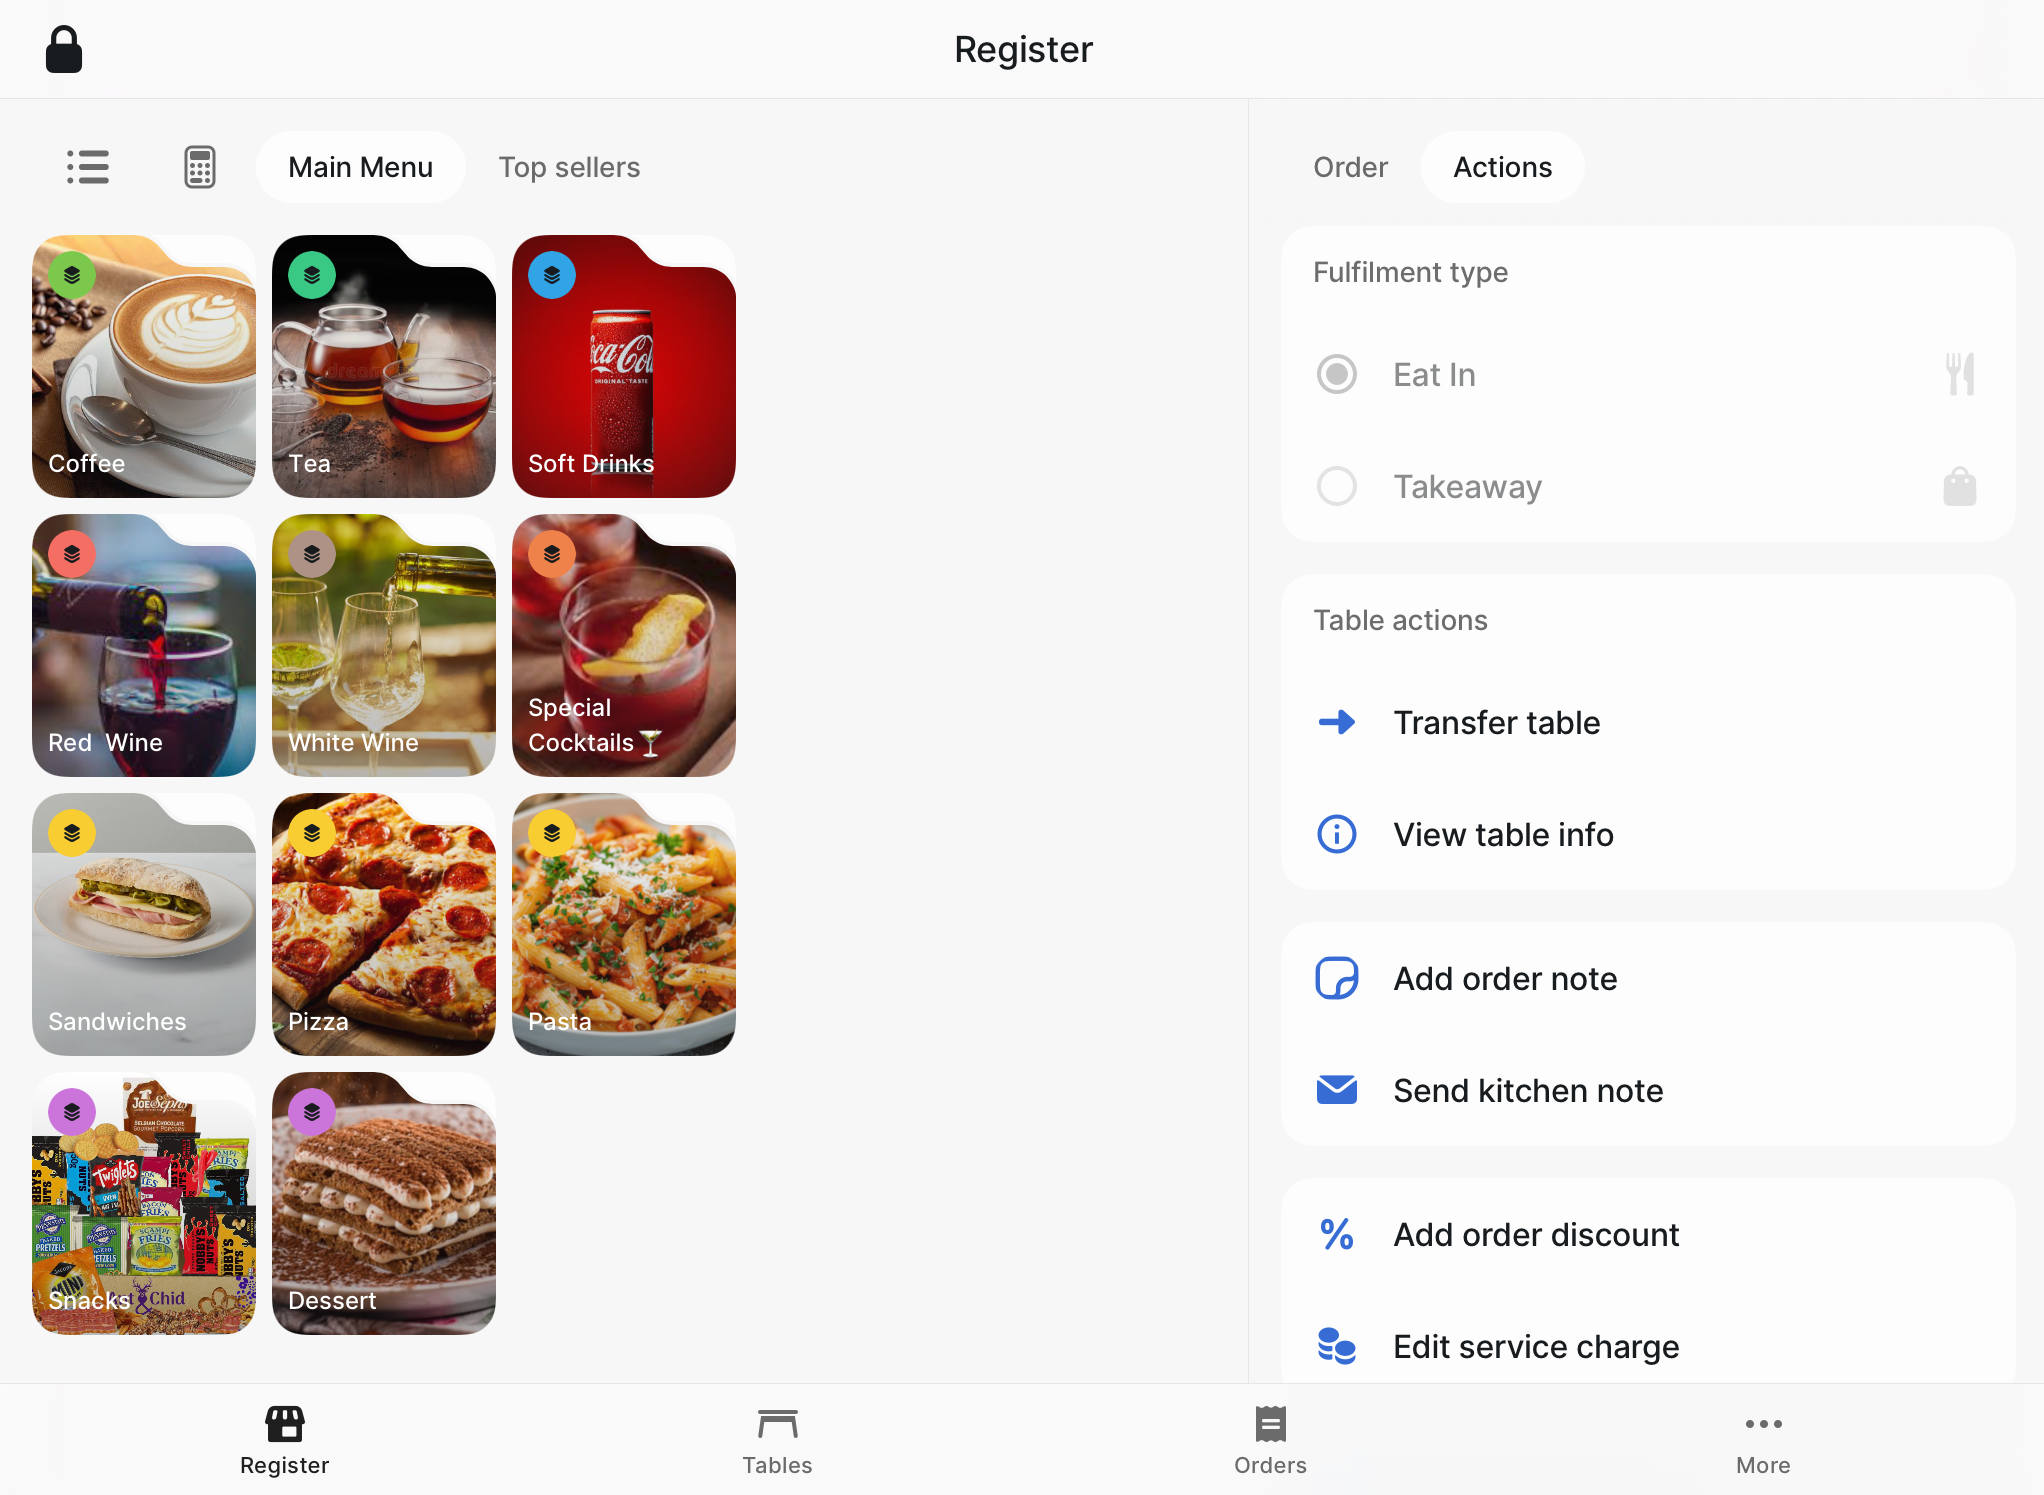
From the Register screen, you can access all order management features to handle orders for tables.
-
On the Actions tab you have the following Table actions:

- Transfer table: Move guests and their orders to a free table.
- View table info: Edit table seats, notes, view orders for the table.
Free tables
Once the guests have paid, mark the table as free to reset its status. To free a table:
- Tap on the table to be freed.
- Tap
Free table.
The table status will change from green to grey , indicating it is ready for new customers.
Table list view
The Table list view provides an overview of all tables in your restaurant, allowing staff to quickly check the status, occupancy, and other details. This view is particularly useful for managing busy service times and monitoring table turnover.
The detailed Table list view is only available on iPad. On iPhone you will see a simplified list view for table service.
- Table: The name or number of the table (e.g., "1", "Patio 1").
- Status: The current status of the table:
- Paid: The table has been settled but not marked as available.
- Available: The table is free for new customers.
- Parked: An order has been started but not yet finalised.
- Occupancy time: The duration the table has been occupied.
- Table guests: The number of guests assigned to the table.
- Order: The order ID associated with the table.
- Total: The total value of the current order.
- Employee: The staff member assigned to the table or who initiated the order.
How to use the table list
- Tap List view while on your floor plan.
- Use this view to:
- Monitor table activity and occupancy times.
- Check which staff member is managing each table.
- Identify parked tables that require attention.
- Tap on a specific line to access available operations for a table.
This feature provides a centralised way to manage tables without navigating the floor plan, offering a clear snapshot of the restaurant's current status.