
Hold funds on a customer's card at the time of service and capture the final amount when your service is complete
Pre-authorisation on Revolut Terminal lets you hold funds on a customer's card at the time of service and capture the final amount later - up to 30 days depending on the card scheme.
This guide covers pre-authorisation for in-person payments using the Revolut Terminal and POS app:
- Native Terminal and POS app flow - take pre-auth payments and manage them (capture, cancel) via the GUI
- Push payments flow - create pre-authorised orders via the Merchant API and push them to the terminal
This guide focuses on the in-person (card-present) pre-authorisation flow. For the full conceptual background, API details, and clearing window rules, see Advanced authorisation.
Pre-authorisation on Revolut Terminal requires a contactless card payment.
| Card brand | Support level | |
|---|---|---|
| Mastercard | All cards | |
| Visa | All except Vpay |
How it works
Pre-authorisation vs. standard terminal payment
Pre-authorisation separates the card tap from the capture. Unlike a standard Terminal payment - which captures funds immediately - a pre-authorised payment places a hold on the customer's card, leaving you in control of when and how much to settle.
For a full explanation of what pre-authorisation is and how clearing windows work, see: What is pre-authorisation.
| Standard payment | Pre-authorised payment | |
|---|---|---|
| When funds settle | Immediately on card tap | When you capture (up to 30 days) |
| Amount flexibility | Fixed at checkout | Fixed at initial authorised amount |
| Receipt at time of payment | Standard payment receipt | Pre-authorisation receipt |
| Order location after payment | Transaction history | Active Orders until captured |
Use cases
Pre-authorisation is suited for in-person scenarios where the final charge amount is unknown at the time of card tap - hotel security deposits at check-in, vehicle rental deposits at pickup, equipment hire. For the full use-case breakdown, see When to use advanced authorisation.
What's available on each surface
Pre-authorisation spans multiple surfaces - the physical Terminal, the POS app (tablet or phone), the POS web portal, and the Merchant API. Not all actions are available on every surface: taking the initial pre-authorised payment requires the Terminal or POS app (or a push payments integration), while managing the order afterwards can be done from any surface. Use the table below to understand which tool fits each step.
| Feature | Revolut Terminal | POS app | POS web portal | Merchant API |
|---|---|---|---|---|
| Take a pre-auth payment | via Terminal | Via push payments* | ||
| Capture (full or partial) | ||||
| Cancel pre-auth |
* The Merchant API also supports pre-authorisation for card-not-present (online) payments. This guide covers only the in-person (push payments) flow. For the full API pre-authorisation guide, see Pre-authorisation.
Pre-authorisation lifecycle
A pre-authorised payment goes through two phases: the initial hold at the start of service, and settlement when the service is complete.
-
Start of service
Merchant selects Pre-authorise in the Terminal or POS app. Customer taps card (contactless). On approval, a pre-authorisation receipt is issued, and the order appears on the Active tab in Orders.
-
End of service
Choose one of three outcomes:
- Full capture - settle the full pre-authorised amount
- Partial capture - settle a lower amount; the remainder is released to the customer immediately
- Cancel - void the hold entirely; funds returned to the customer immediately, without going through the standard refund process
The maximum hold period depends on the card scheme and your Merchant Category Code (MCC). Always check the indicated deadline in your order details (capture_deadline) - do not rely solely on the 30-day figure. See Clearing windows.
Pre-authorisation in the POS apps
Enable pre-authorisation
To enable pre-authorisation on your Terminal or POS app:
- Go to More > Checkout.
- Toggle Pre-authorisation to enable it.
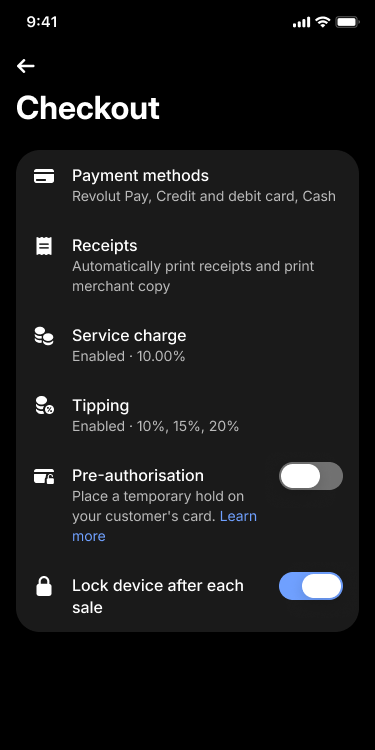
Staff access to Checkout settings can be restricted via the POS web portal Team settings.
Pre-authorise a payment
Only contactless card payments are supported for pre-authorisation at this stage. If a customer tries to insert their card, prompt them to tap instead.
Once pre-authorisation is enabled, follow these steps to pre-authorise payments:
- On the Register screen, enter the amount or add products.
- Tap Checkout to proceed to the checkout screen.
- On the checkout screen, choose your payment mode:
- Pre-authorise - hold funds on the customer's card and capture the final amount later
- Pay - take a standard payment that settles immediately
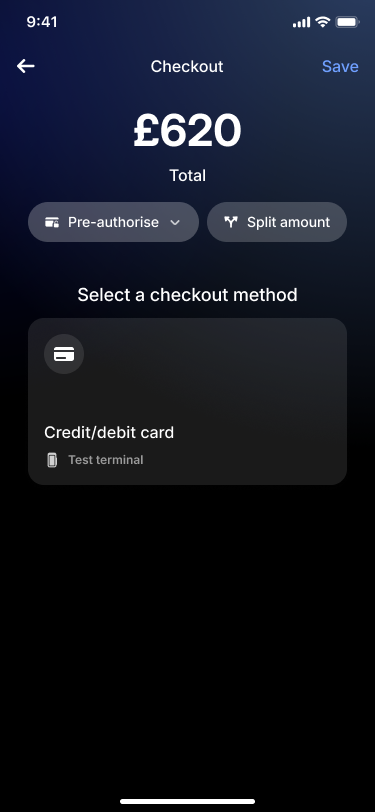
Once your customer taps their card and the pre-authorisation is successful, the terminal issues a pre-authorisation receipt. The authorised order appears on the Active tab in Orders.
If the payment is declined, the customer can try a different card, or you can cancel the transaction.
Manage pre-authorised orders
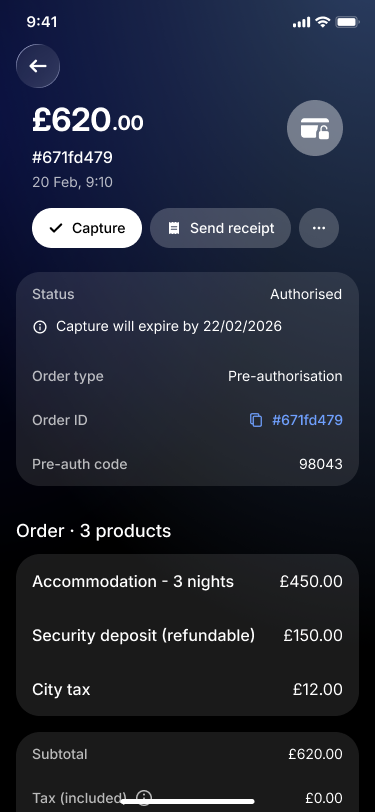
Pre-authorised orders remain in Authorised state until captured, cancelled, or expired. You can manage them from the Terminal device, POS app, or POS web portal on the Active tab in Orders menu.
Capture pre-authorised payment
Settle the held amount when the service is complete. You can capture the full authorised amount or a partial amount.
| Full capture | Partial capture | |
|---|---|---|
| What it does | Settles the entire held amount | Settles a lower amount than authorised |
| Remaining funds | — | Released to the customer's card immediately |
| When to use | Final charge equals the authorised amount | Final charge is less than the held amount |
| Can capture again | — | No - partial capture is final |
Partial capture is final. You cannot capture the remaining amount later.
- Open Orders and go to the Active tab.
- Select the pre-authorised order and tap Capture.
- Confirm the full amount and tap Continue.
- Confirm the capture by tapping Capture.
- The final receipt is issued, and the order moves to Completed state on the Paid tab.
Cancel pre-authorisation
If the service is not delivered, cancel the hold to release funds immediately to the customer - without going through the standard refund process.
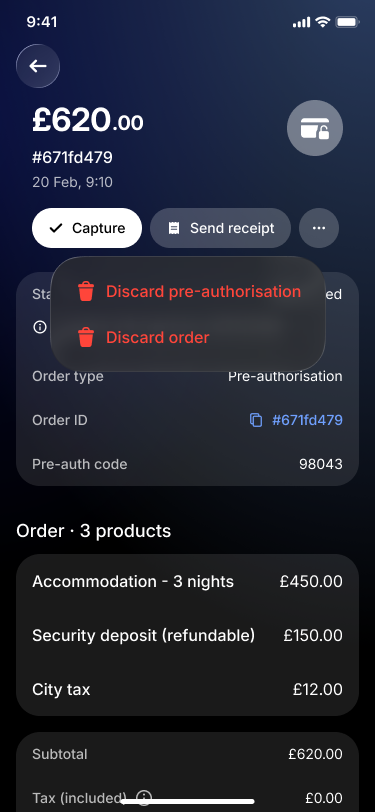
- Open Orders and go to the Active tab.
- Select the pre-authorised order, tap and select Discard pre-authorisation.
- Confirm by tapping Discard. The order moves to Cancelled state — only the receipt is available.
For POS integrators
If you're integrating a 3rd-party POS system via push payments, you can create pre-authorised orders via the Merchant API and push them to the Terminal.
Pre-authorisation requires manual capture, which separates authorisation from settlement, giving you control over when and how much to capture once the service is complete.
To create a pre-auth order, set both capture_mode and authorisation_type in your order creation request:
{
  "amount": 10000,
  "currency": "GBP",
  "channel": "pos",
  "location_id": "<your_location_id>",
  "capture_mode": "manual",
  "authorisation_type": "pre_authorisation",
  "fulfilment_type": "eat_in",
  "metadata": {
    "pos_partner_name": "YourPOS"
  }
}Push the payment intent to the terminal as normal, following the Push payments to Revolut Terminal guide.
Once the customer pays via card-present on the Terminal, the order appears in POS web portal and the POS app. You can manage it from either surface. Additionally, you can manage pre-authorised orders programmatically via the Merchant API.
For more information about managing pre-authorised orders via the Merchant API (capture, cancel), see Pre-authorisation.